Recipe 29. GeRT: Bad Stim Flash Correction in MIPS-70 data
In this recipe, we use the GeRT to correct for a poor stimflash calibration in 70 microns photometry observations, before running MOPEX to create the final mosaic. For those users who are not interested in diffuse extended emission, such as the ISM, this recipe then continues in a filtering step.
The data should be retrieved from the Spitzer archive (see Recipe 1). Search the archive by AOR and download the post-BCD, BCD and raw data for the following dataset: AOR 5568512.
You will need approximately 160 MB of space available to download and unpack the data. Once you have downloaded the files to your disk, unzip them into a new working directory. The data will be unzipped into subdirectories r5568512/ch2/bcd/, r5568512/ch2/pbcd/ and r5568512/ch2/raw/.
29.2 Have a quick look at the data
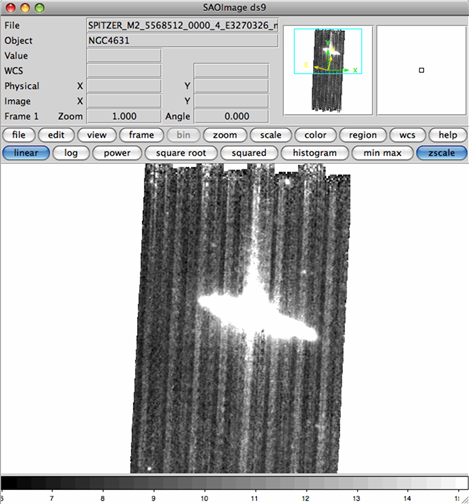
The online (=automatically produced) 70 micron mosaics may not be good enough to start analyzing for science right away, but they are good enough to quickly assess your data - did you see something bright or not? For an initial look at your data, use ds9 or your favorite image viewer to examine the on-line mosaics that came with your data.
unix% cd /where/you/unpacked_data/r5568512/ch2/pbcd/
The view in SAOIMAGE-DS9 is below. There are two immediately noticeable problems with this mosaic. Firstly, the vertical striping across the detector. This can be mitigated with careful re-filtering of the BCDs, and is explored in the next recipe, GeRT: Filter Extended Sources in MIPS-70 data. The second issue is the "smearing" of the galaxy up the column on which it appears. This is due to a poorly calibrated stim response, caused by the stim flash being taken while the field of view was on top of the bright galaxy. This cookbook addresses how to correct for this type of poor stim calibration by re-creating the BCDs from the raw files using the GeRT.
29.3 Mosaic the BCDs to identify the bad stim flash frames
Start the MOPEX GUI and load the template mosaic flow for MIPS 70 microns data (go to File > New Mosaic Pipeline > Mosaic, MIPS 70 microns and hit "ok"). Set up the flow by setting the Image Stack File to point to the file listing the *bcd.fits files and choosing an Output Directory. Be patient when trying to load the Image Stack File - the directory contains a lot of images, and it takes a while for MOPEX to load the directory contents into the file selection window. Next you need to click on "Optional Input & Mask Files" and set the Sigma List File and the DCE Status Mask File to point to the lists of the *bunc.fits and *bmask.fits files, respectively. Again, be patient, as it takes a while for MOPEX to display the directory contents. The Pmask FITS File should be set to the MIPS 70 microns PMask file found in the cal/ directory of your MOPEX distribution (cal/mips70_pmask.fits), but the other input files can be left blank. Click "OK" and then start the Mosaic flow by clicking on the green arrow in the top right corner of the MOPEX window.
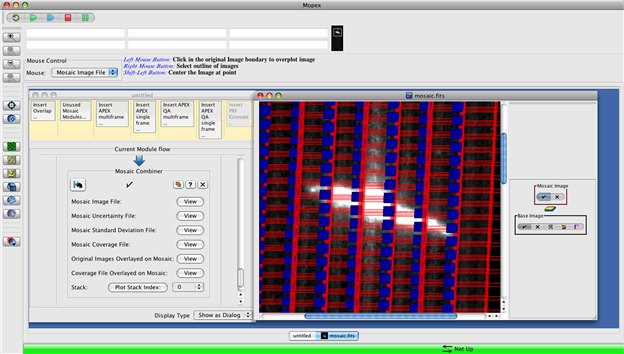
Once the mosaicking process has finished, click on "View" next to "Mosaic Image File". This will bring up the combined mosaic image and ask you whether you'd like to see the BCD outlines. Click "Yes" to overlay the BCDs on the mosaicked image.
We are trying to identify the stim flashes that have been taken on top of the bright galaxy, so zoom in on that region of the mosaic using the zoom function on the left hand toolbar. Once you have zoomed in on the galaxy, you should click on the image somewhere over the galaxy. This will bring up a dialogue box listing all of the BCDs that contributed to the pixel that you clicked on. Compare this list of contributing BCDs to the list of stim flash files that you made above. If any of the contributing BCDs are stim flash files then you should make a note of them so you can remove them from the GeRT input lists in the next step. Then hit "Cancel" to avoid opening all of the individual BCDs. Repeat this process over the area covered by the galaxy until you have identified all the stim flash frames. You should have found 5 files:
Once we have identified the bad stim frames in Section 25.3, we need to recreate the BCDs from the raw files, skipping over the poorly-calibrated stims. To do this we use the GeRT. Start by moving to the directory containing the raw files:
unix% cd /where/you/unpacked_data/r5568512/ch2/raw/
Now list all of the raw files into a single text file:
unix% ls *raw.fits > rawlist.txt
and edit it to remove the bad stim flash files using emacs or your favorite editor.
29.5 Running the GeRT
Make sure that you have set up and tested the GeRT before you try to run it, following the test procedure outlined in the GeRT Manual.
Set up the paths for the GeRT by sourcing the setup script. The directory name for the GeRT package depends on your system, but for the Mac Intel you would type e.g.:
Run the GeRT on your raw files to create the new BCDs, giving the input list of raw files and the desired output directory as arguments on the command line:
unix% $WRAPDIR/gert.pl rawfiles.lis OUTdir
The GeRT will now process your raw data files and produce new BCDs, writing them into either your output directory or a subdirectory of your output directory called bcd/ (depending on your platform).
29.6 Re-mosaic the data
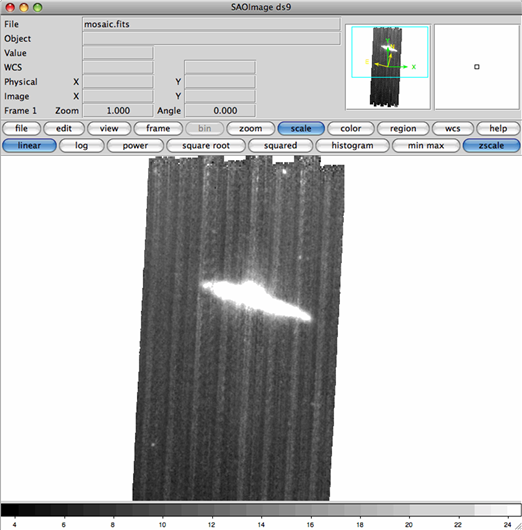
Finally, re-make the input files as in Section 25.3, but this time remove all of the stim flash frames from the lists, and remove the first couple of frames from the list to mitigate the first-frame effect. Once you have edited the input lists, start a new Overlap flow in the MOPEX GUI by going to File > New Overlap Pipeline and selecting the MIPS 70 microns overlap template. Read in the input files as in Section 25.3, and set a new output directory. Now add in the Mosaic pipeline by clicking on the yellow box near the top of your flow window labelled "Insert Mosaic..." and select the MIPS 70 microns template. This will append the Mosaicking pipeline to the end of the Overlap flow. Finally, hit the green "play" arrow in the top toolbar to set MOPEX going and create your final mosaic. The final product should look as follows:
See the next recipe, entitled GeRT: Filter Extended Sources in MIPS-70 data, for instructions on how to filter this dataset to remove the vertical striping.