Recipe 30. GeRT: Filter Extended Sources in MIPS-70 data
This recipe describes how to use the GeRT to filter your MIPS 70 microns BCD frames for extended targets, e.g. galaxies. WARNING: users who are interested in extended background emission such as the ISM should *not* filter their data, as this type of emission is removed during the process.
The filtered BCDs (*fbcd.fits) downloaded from the archive and created automatically with the GeRT are optimised for point sources only. Users wishing to analyse data of extended sources must either work on the non-filtered BCD frames (*_bcd.fits), or filter the BCDs with different parameters. This demonstration follows on from a previous recipe: GeRT: Bad Stim Flash Correction in MIPS-70 data, using the same data set. We assume that you have worked through the previous recipe before beginning this one.
30.1 Requirements
You will need to follow through the previous Data Analysis Recipe (Recipe 28) GeRT: Bad Stim Flash Correction in MIPS-70 data before beginning this demonstration.
30.2 Inspect the mosaic created in the previous Data Analysis Recipe
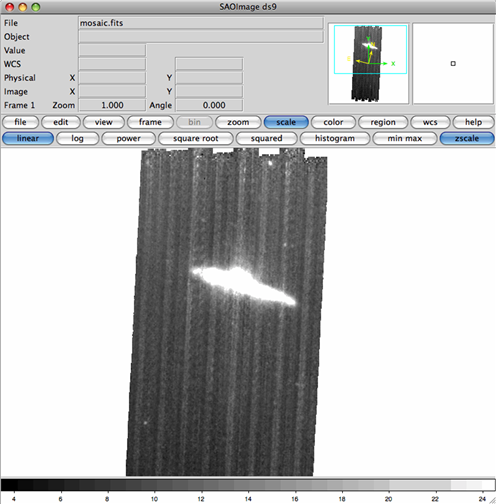
In the previous recipe, GeRT: Bad Stim Flash Correction in MIPS-70 data, you downloaded the MIPS 70 microns data from the archive, and corrected for a bad stim flash calibration. This left you with a mosaic that looked like this:
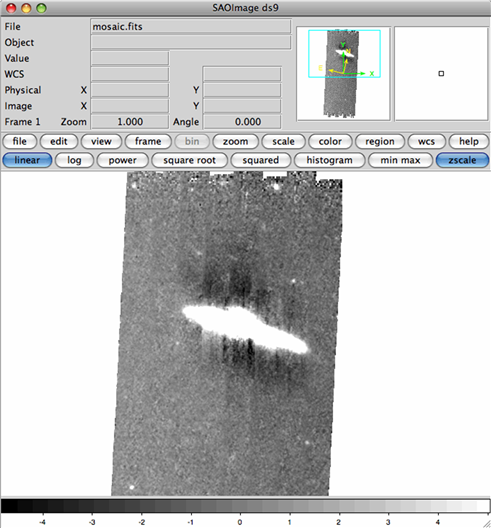
The next step in the reduction process is to filter out the vertical striping in the mosaic. When you download your data from the archive, or when you run the GeRT to reproduce the BCDs from the raw files, there are two types of Basic Calibrated Data frame generated: *bcd.fits (the unfiltered BCDs) and *fbcd.fits (BCDs that have been filtered, with the filtering parameters optimised for point sources). Since we are looking at an extended source, we can't use the existing fBCDs. If you were to mosaic together the fBCD frames, or look at the filtered archive mosaic in the pbcd/ directory (with the extension .mfilt) you would find the following, with negative side-lobes (dark areas) around the bright source:
In order to carry out an appropriate filtering for this extended source, we need to get an estimate of the position and the x and y sizes (in pixels) of the source. This will allow us to mask out the galaxy when calculating the median background level. Looking at the mosaic created in the previous recipe, we find that the galaxy is located at RA: 288.13909 degrees, Dec: 67.66165 degrees, approximately 33 pixels across and 105 pixels in length. This will become our mask position and size when running the GeRT.
30.3 Setting up the input files
In order to refilter the BCDs, the GeRT requires five input files:
a list of the unfiltered bcds (*.bcd.fits);
a list of the associated uncertainty files (*.bunc.fits);
a list of the associated mask files (*.bmask.fits);
an input namelist for masking out the bright galaxy when calculating the background level;
an input coordinate list marking the center of the object(s) to be masked.
To create these files, change directory to the folder where the new BCDs were created in the last recipe:
unix% cd /where/you/unpacked_data/r5568512/ch2/raw/OUTdir/bcd/
Create the 3 lists of *.bcd.fits, *.bunc.fits and *.bmask.fits files from the command line as follows:
unix% ls *.bcd.fits > imagelist.txt
unix% ls *.bunc.fits > sigmalist.txt
unix% ls *.bmask.fits > masklist.txt
You need to ensure that all of the files you are working with were taken with the MIPS 70 microns detector set as the prime array. This information can be found in the image header with the keyword PRIMEARR = 1. Remove from the input lists any files that have PRIMEARR = 2 or PRIMEARR = 3.
Now you need to create an ASCII source table, source.tbl with the coordinates of the center of the object to be masked. The table must be in exactly the following format, giving the RA and Dec of the source in degrees. Please note that the vertical bars are essential, the values in the columns must fall between those bars, and the column headings are case-sensitive:
|srcid |RA |Dec |
|I |d |d |
1 190.524 32.542
Finally, you need to set up the namelist file that controls the GeRT input parameters. This file is located in the subdirectory cdf/ of your GeRT installation, and must stay there. Edit it in place, e.g. on my system I would go to:
where the dimensions of the MaskBox are slightly bigger than the size of the galaxy in the mosaicked image. The box size is specified in pixels.
30.4 Running the GeRT
Once the input files are set up, you can run the GeRT to refilter the BCDs. Change directory to the folder containing your data and ensure that the GeRT is ready to run by sourcing the setup file, e.g. for my system I would type the following:
unix% cd /where/you/unpacked_data/r5568512/ch2/raw/OUTdir/bcd/
You will probably see a number of warnings and error messages flash by while the script is running. Usually these are normal and can be disregarded. Once the script has finished, move to the newly created output directory (named as you specified on the command line, but with a prefix "cc" e.g. ccOUTPUT/) and check whether the new BCDs have been created. If you have created the output directory as a subdirectory of your current working directory then the files will be in a further subdirectory called bcd/, i.e. in ccOUTPUT/bcd/. If you specified that the output directory is made elsewhere then the BCD files will be in the top-level of the output directory (i.e. in ccOUTPUT). If the new files exist then everything worked. These files are your re-filtered BCDs, optimised for the analysis of extended sources.
30.5 Re-Mosaicking the new BCDs
The final step is to use MOPEX to re-mosaic the re-filtered BCDs to check the results of the refiltering. Re-make the input lists imagelist.txt, sigmalist.txt and masklist.txt as in Section 26.3, but this time list the new BCDs in imagelist.txt, remove all of the stim flash frames from the three lists (i.e. files with header keyword STMFL_70 = 1), and remove the first couple of frames from them to mitigate the first-frame effect.
Once you have created the input lists, start the MOPEX GUI and load the Overlap template for MIPS 70 microns data (go to File > New Overlap Pipeline > Overlap, 70 microns and hit "ok"). Now insert the Mosaic pipeline by clicking on the "Insert Mosaic" button at the top of the flow. Set up the flow by setting the Image Stack File to point to the new list of BCDs and choosing an Output Directory. Be patient when trying to load the Image Stack File - the directory contains a lot of images, and it takes a while (up to a minute) for MOPEX to load the directory contents into the file selection window. Next you need to click on "Optional Input and Mask Files" and set the Sigma List File and the DCE Status Mask File to point to your sigmalist.txt and masklist.txt files, respectively. Again, be patient as it takes a while for MOPEX to display the directory contents. The Pmask FITS File should be set to the MIPS 70 microns PMask file found in the cal/ directory of your MOPEX installation (cal/mips70_pmask.fits) but the remaining input files can be left blank. Click "OK" and then start the flow running by clicking on the green "play" arrow in the top-left corner of the MOPEX window. Again, be patient when waiting for the flow to start.
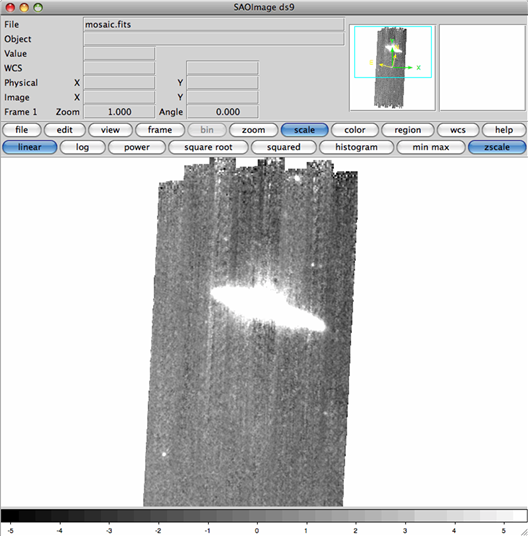
Once the flow has finished, you should have a mosaic that looks like the one below.
While the correction to the striping isn't perfect, this is often as good as it is possible to get when a bright object is near the end of a scan leg. By removing the poorly calibrated stim flashes that were taken on top of the galaxy (see Recipe 28), there are often no more stim flashes before the end of the scan legs, and so the calibration is extrapolated from the stim flashes taken earlier. This can lead to imperfect calibration at the end of the scan leg. Despite this, the effect is small - a tiny fraction compared to the bright source.