[an error occurred while processing this directive]
PREVIOUS START
Tutorials
The following examples will walk you through some common search types using Gator:
Single Object Search
Coordinate Search - Cone
Coordinate Search - Cone with Email
Coordinate Search - Box
Coordinate Search - Polygon
Multi-Object Search (Web Form)
Multi_Object Search (Table)
Coordinate Search with Constraints
Coordinate Search Using the Long Form with Constraints in Output
Coordinate Search Using the Long Form with Constraints Not in Output
Additional Constraints Query
All Sky Search - Source Counts
All Sky Search - Table Output
All Sky Search - Kepler Target Selection Catalog IDs
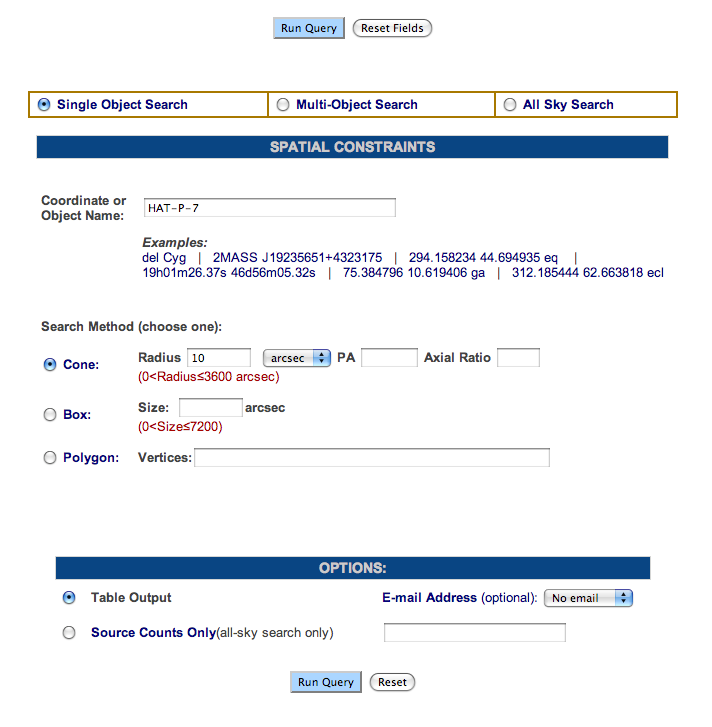
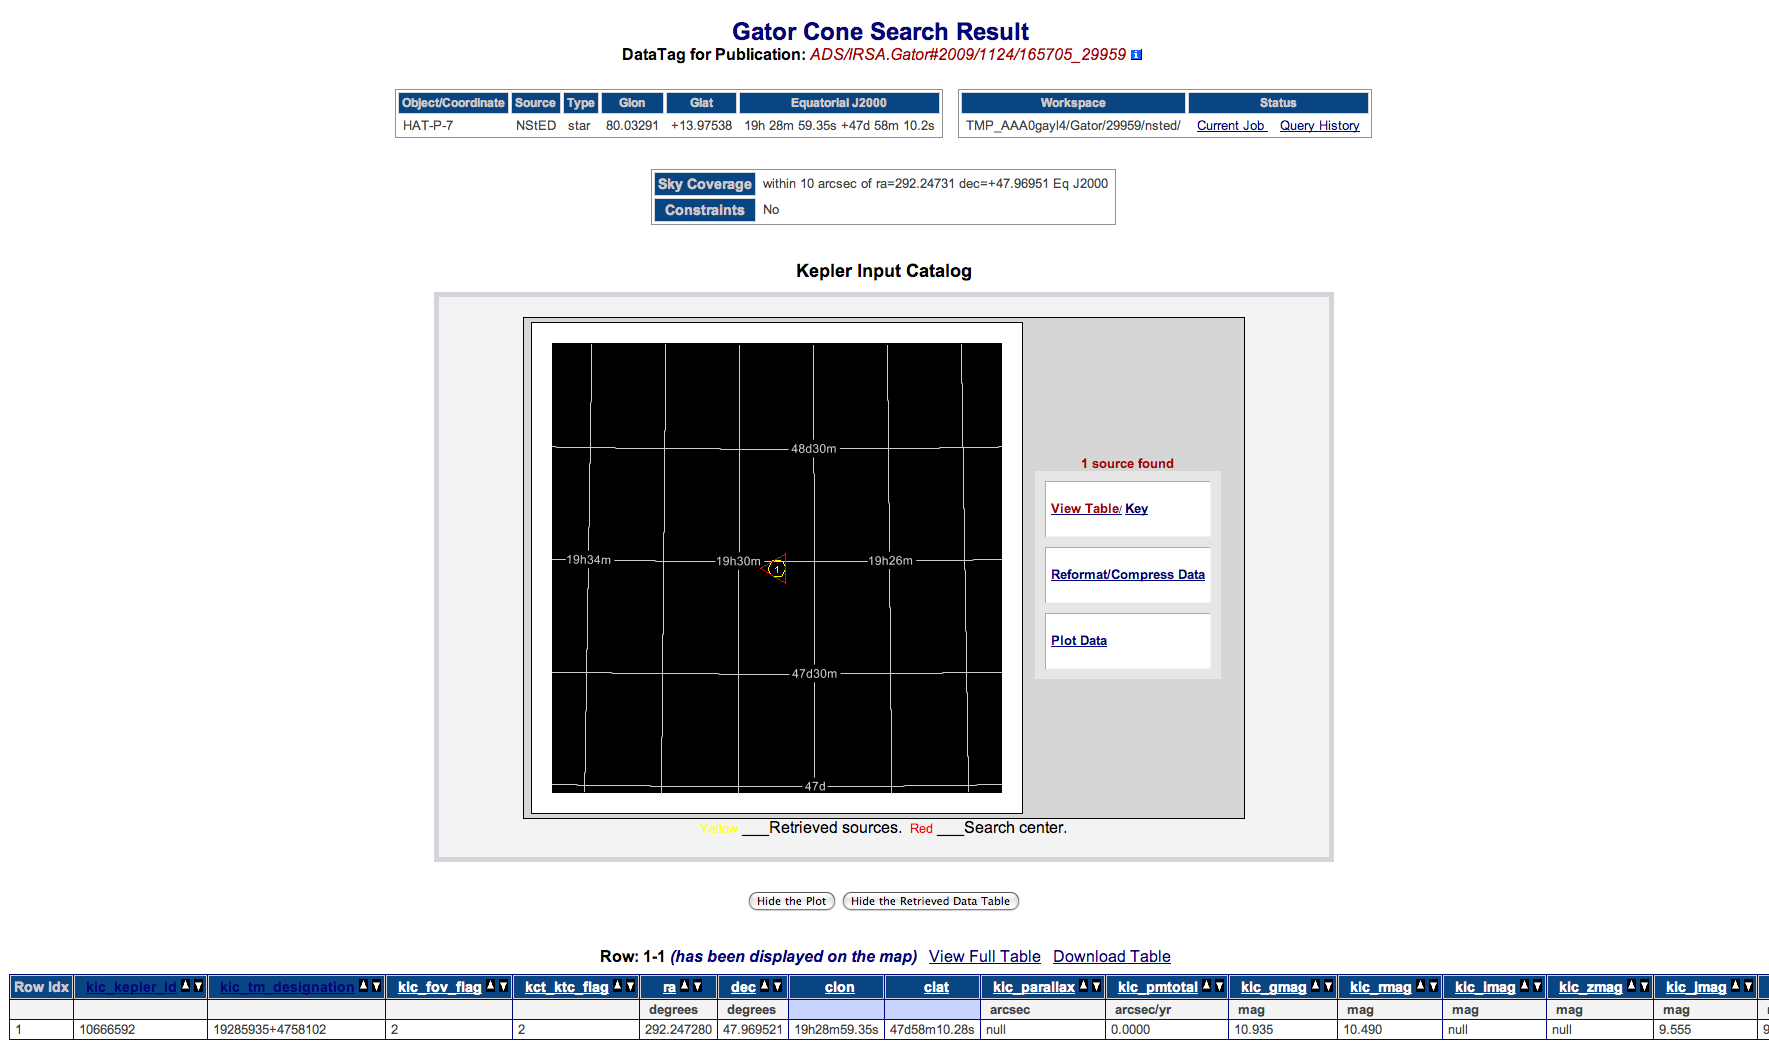
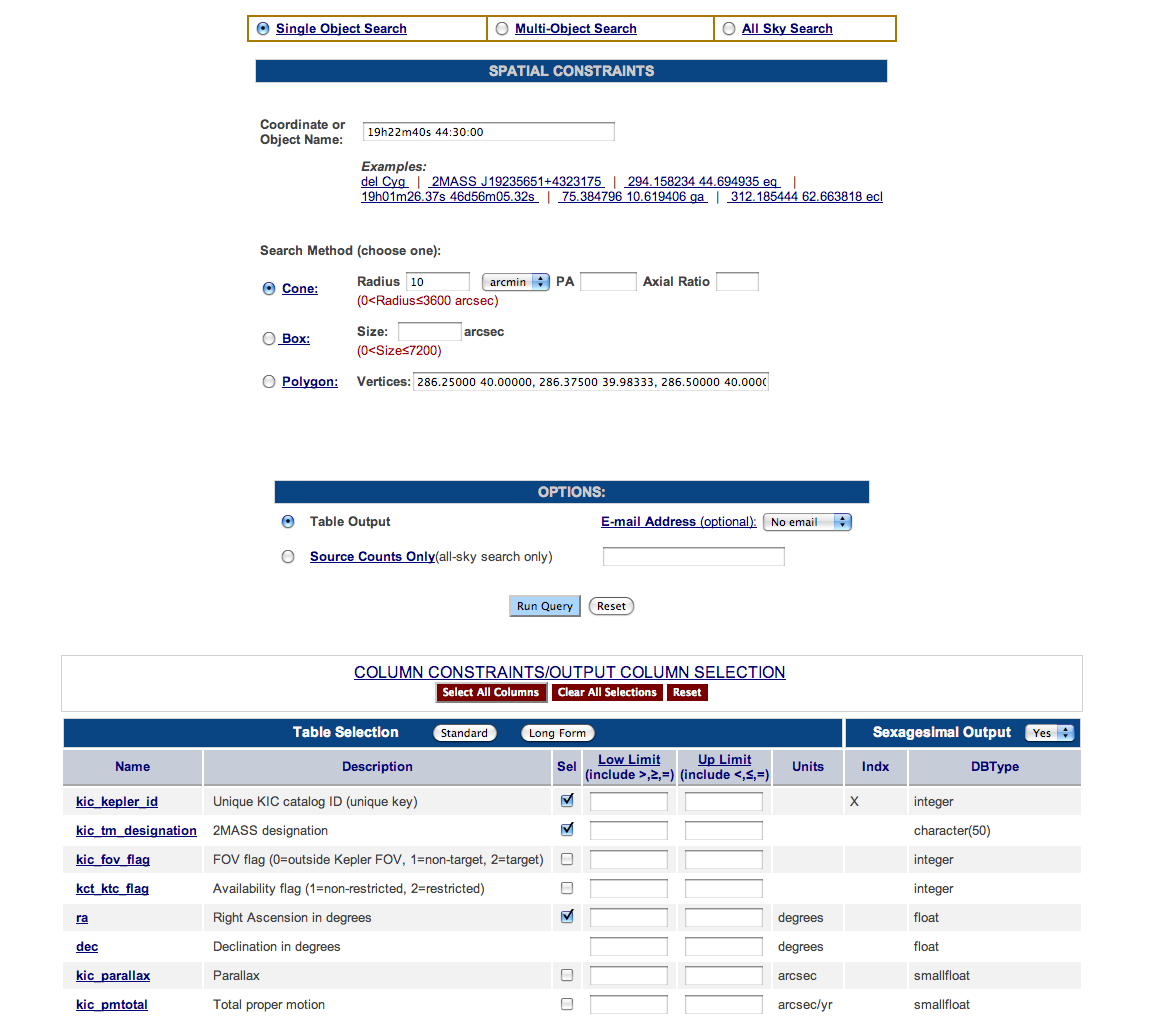
Single Object Search
This search looks for all of the objects within a given vicinity of a single position or object.
- Select the radio button next to Single Object Search. Type HAT-P-7 into the Coordinate or Object Name textbox.
- Select the radio button next to Cone. Specify a radius if 10 in the textbox and select "arcsec" from the pulldown menu, if these are not already selected.
- Select the radio button next to Table Output.
- Click the Run Query button.
The Result page will be displayed:
At the top, you will see a table with the Object name or coordinates, the archive that resolved the name (if used), Type, Galactic Longitude, Galactic Latitude, Equatorial J2000 Right Ascension
and Declination, name and path of the workspace used, and the Current Job and Query History hyperlinks.
Below this, you will see the location in the sky that you specified, as well as any constraints. Note that the right ascension and declination are expressed in different ways in the different
tables. These values are equivalent.
In the middle of the page is a map with the location of your object. To the right of the page are a number of hyperlinks. These allow you view the output table, reformat/compress the data or
plot the data. You can use the Hide the Plot or Hide the Retrieved Data Table buttons to hide portions of your results. Click the View Table hyperlink, and you can view your
results and download the result table in an ASCII file. Note that only the columns that had their Sel checkboxes selected will be shown in the result table.
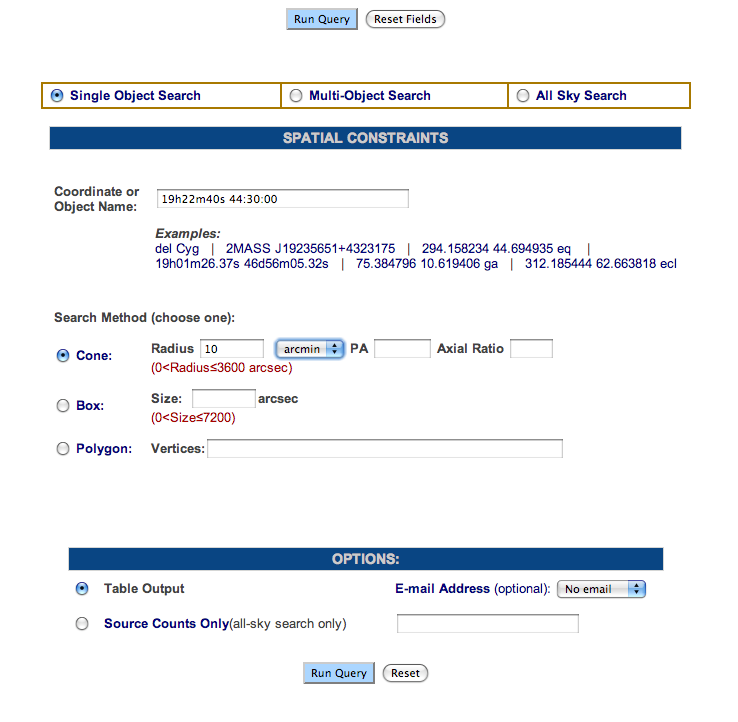
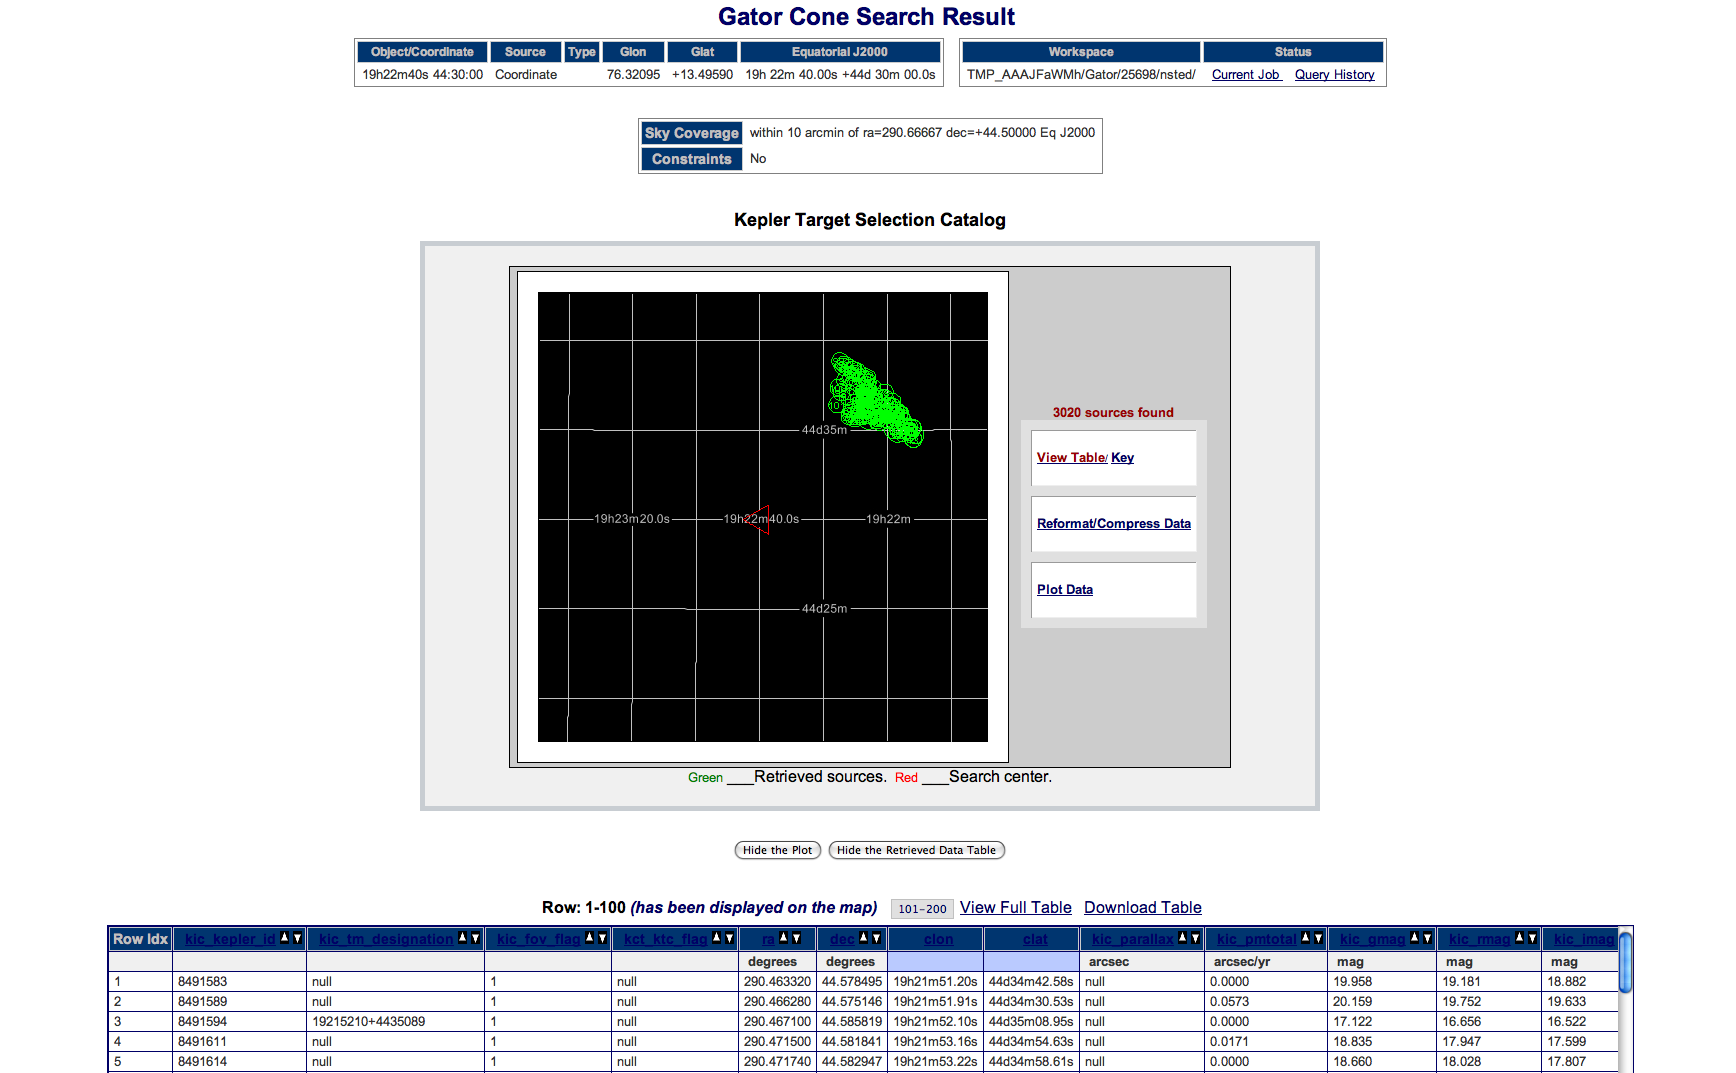
Coordinate Search - Cone
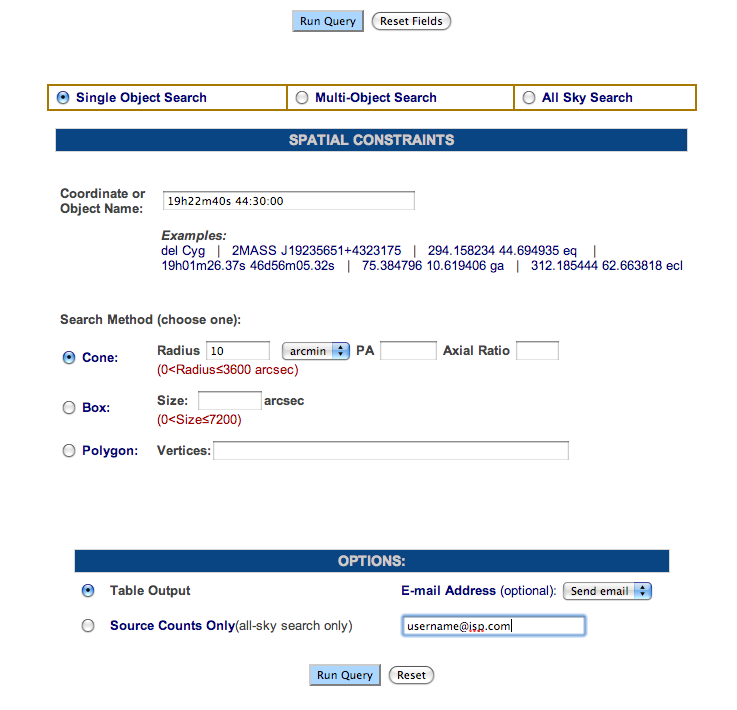
This example performs a typical coordinate search in a cone-shaped area. In particular, it searches all of the objects centered on the Kepler Field within a radius of 10 arcminutes.
- Select the radio button next to Single Object Search. In the Coordinate or Object Name textbox type: 19h22m40s 44:30:00.
- Click on the radio button next to Cone, if it is not already selected. Type 10 in the radius textbox. Select "arcmin" as the unit from the pulldown menu.
- Click on the radio button next to Table Output, if it is not already selected.
- Click the Run Query button.
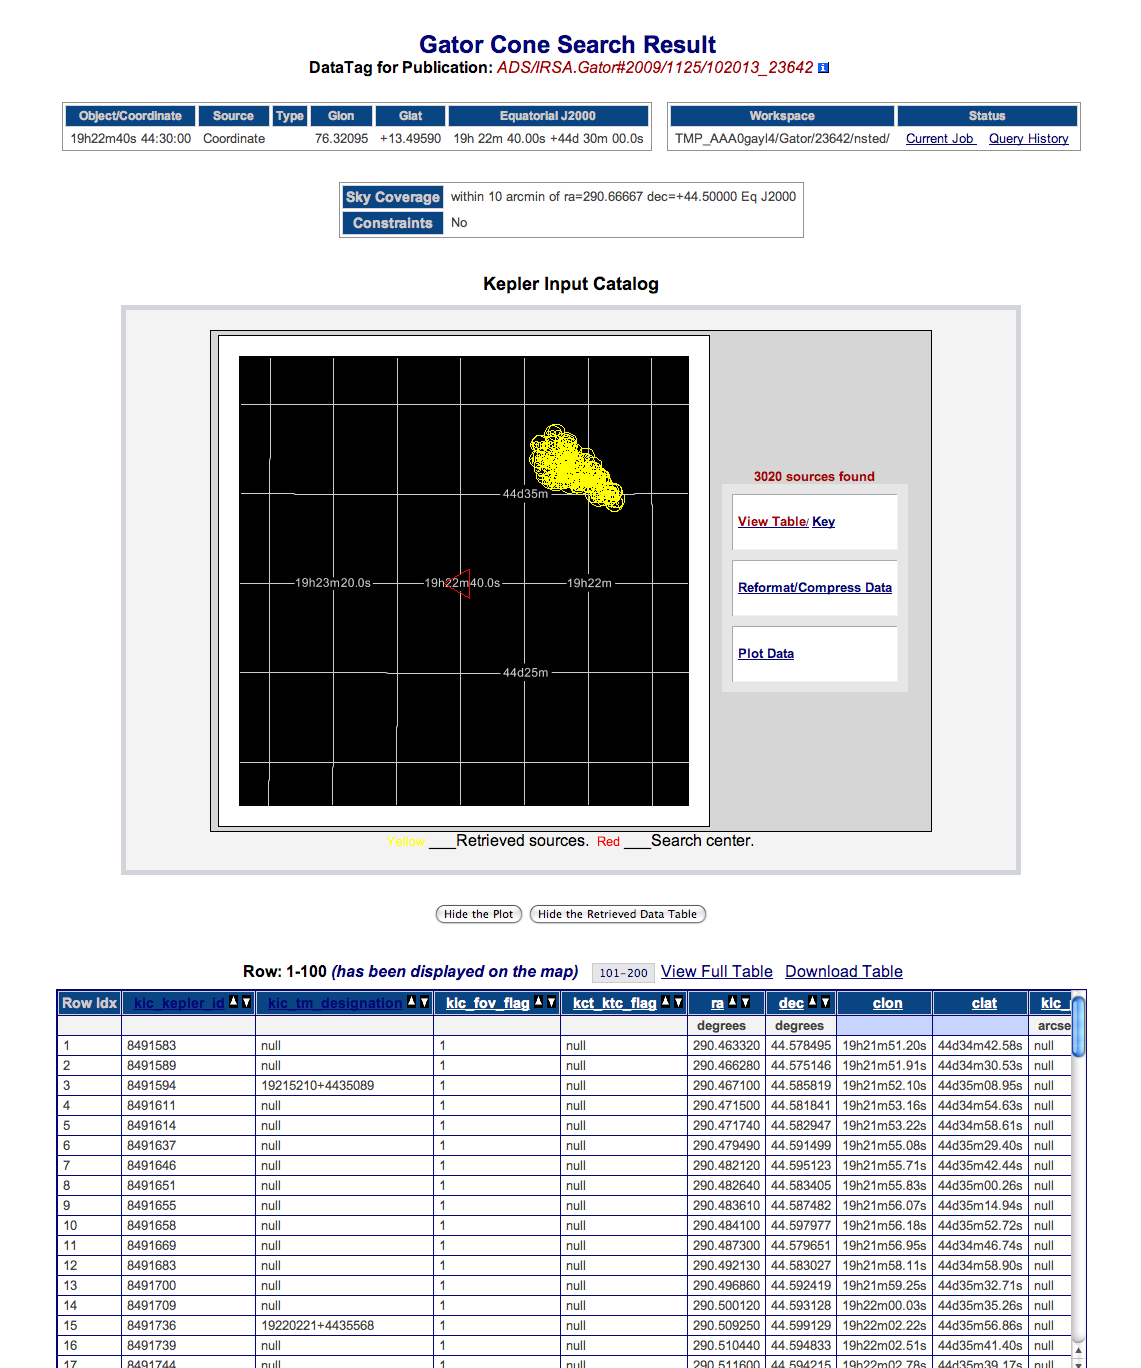
Your results page will look like this:
showing a total 3,020 objects returned.
Coordinate Search - Cone with Email
This example performs the same search as the previous example except it sends you an email
with a link to the results page.
- Select the radio button next to Single Object Search. In the Coordinate or Object Name textbox type: 19h22m40s 44:30:00.
- Click on the radio button next to Cone, if it is not already selected. Type 10 in the radius textbox. Select "arcmin" as the unit from the pulldown menu.
- Click on the radio button next to Table Output, if it is not already selected.
- Type your fully qualified email address into the Email Address textbox. Select "Send email" from the pulldown menu.
- Click the Run Query button.
The email will be similar to this:
Your results page will look like this:
showing a total 3,020 objects returned.
Coordinate Search - Box
This example builds on the previous Coordinate example, using a Box search instead of a Cone search.
- In the Coordinate or Object Name textbox type 19h22m40s 44:30:00.
- Click on the radio button next to Box. Type 500 in the Size textbox.
- Click on the radio button next to Table Output if it is not already selected.
- In the Column Constraint table, click the Clear All Selections button.
- Click the Sel checkbox next to kic_jmag. Type >12 in the Low Limit textbox and <16 in the Up Limit textbox.
- Click the Sel checkbox next to kic_teff. Type >5500 in the Low Limit textbox and <6500 in the Up Limit textbox.
- Click the Sel checkbox next to ra, kic_kepler_id and kic_tm_designation. This will include these parameters in your results.
- Click the Run Query button. Your results will look like this:
and a total of 29 objects will be returned.
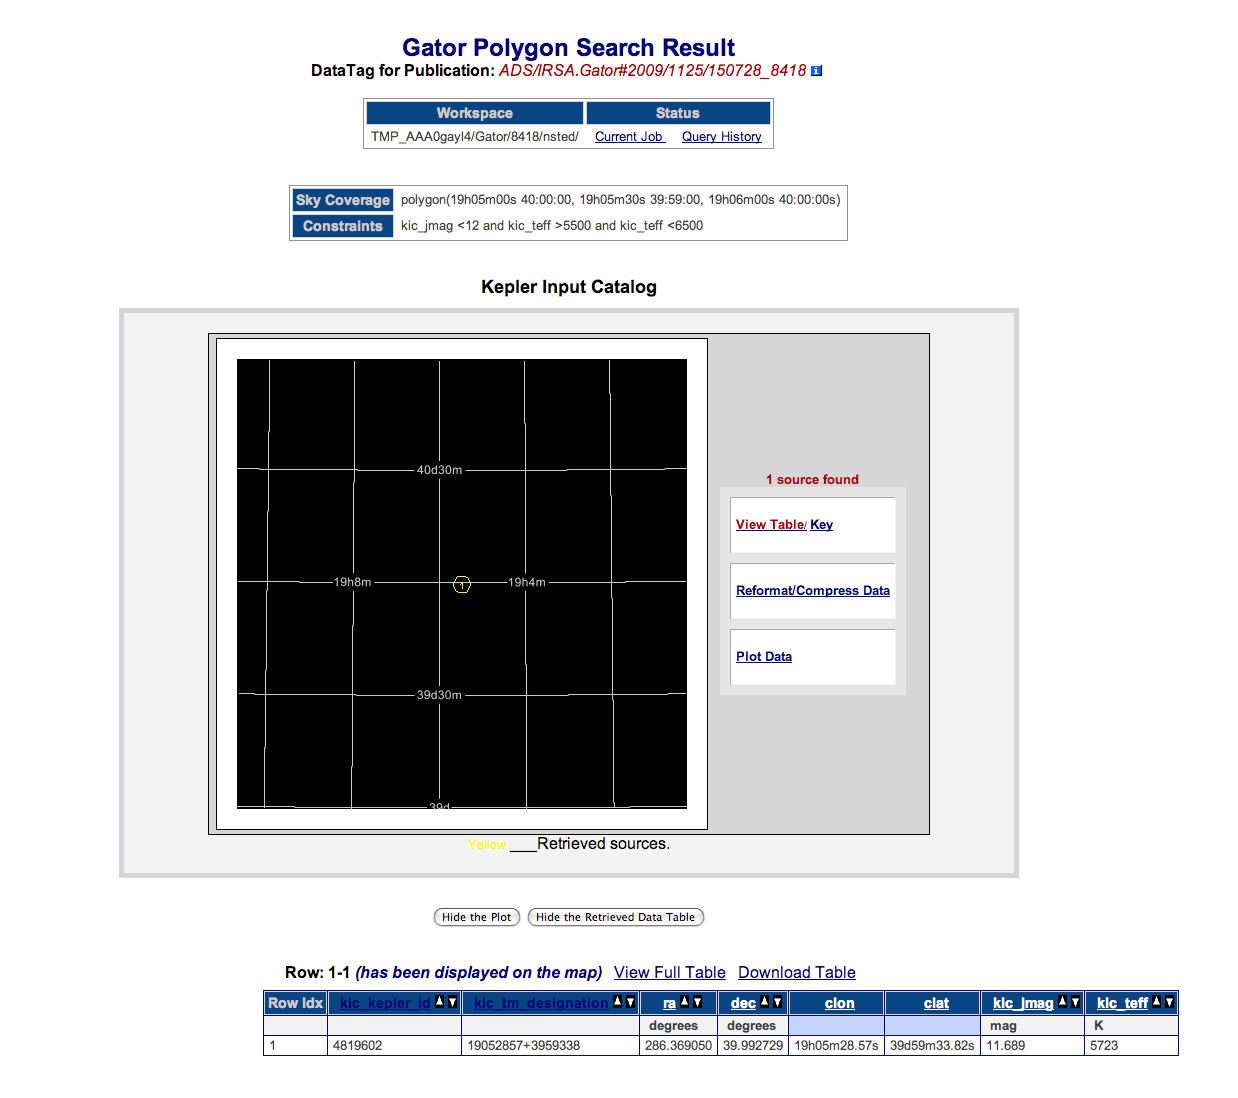
Coordinate Search - Polygon
This example performs a polygon search. This search allows you to define your own shape, in this case a triangle. Each of the vertices must be defined as a J2000 RA and Dec pair, in decimal degrees.
- Click on the radio button next to Polygon. Type the following in the Vertices textbox: 19h05m00s 40:00:00, 19h05m30s 39:59:00, 19h06m00s 40:00:00s.
- Click on the radio button next to Table Output, if it is not already selected.
- Click the Sel checkbox next to kic_jmag. Type <12 in the Low Limit textbox.
- Click the Sel checkbox next to kic_teff. Type >5500 in the Low Limit textbox and <6500 in the Up Limit textbox.
- Click the Sel checkbox next to ra, kic_kepler_id and kic_tm_designation. This will include these parameters in your results.
- Click the Run Query button. Your results will look like this:
and the search will return one object.
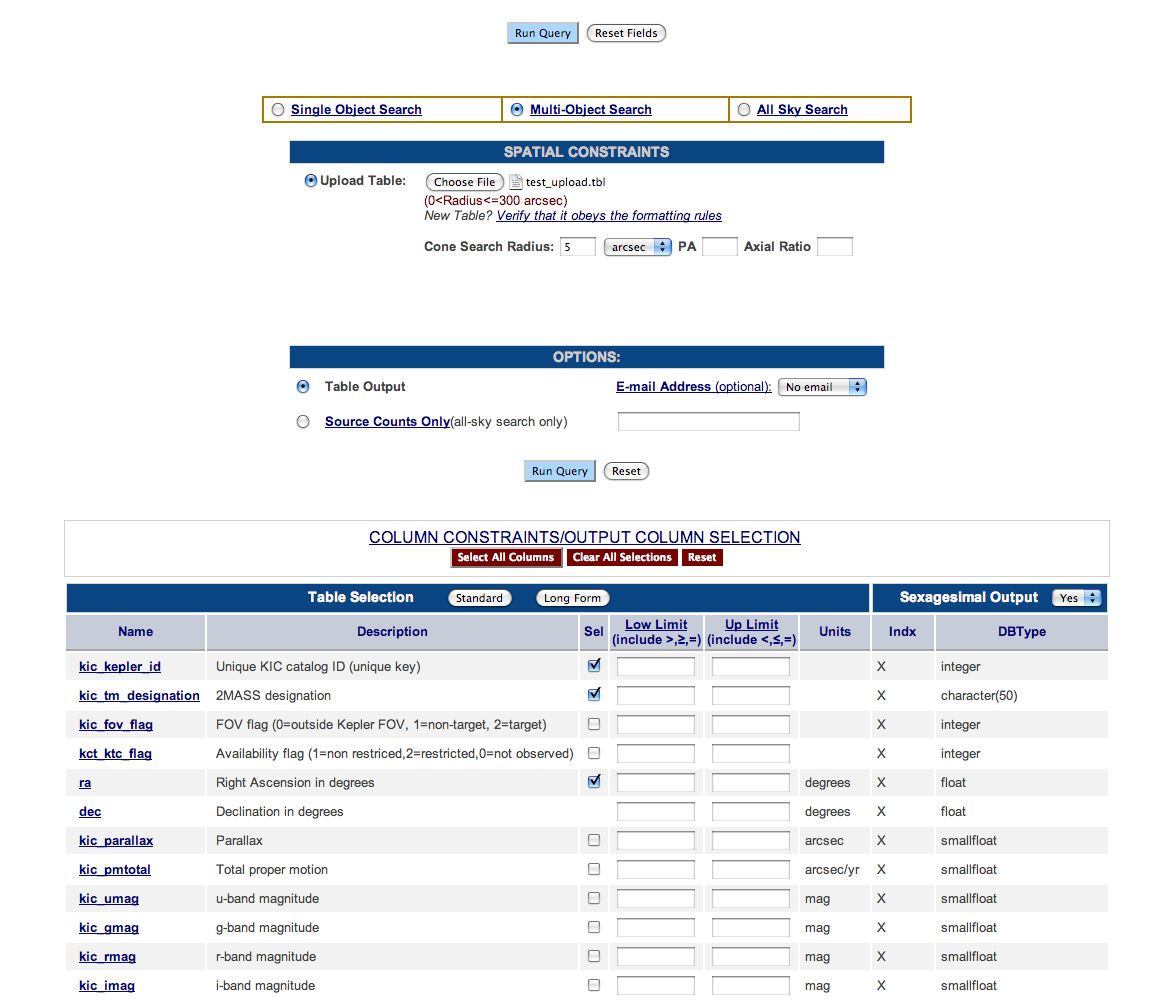
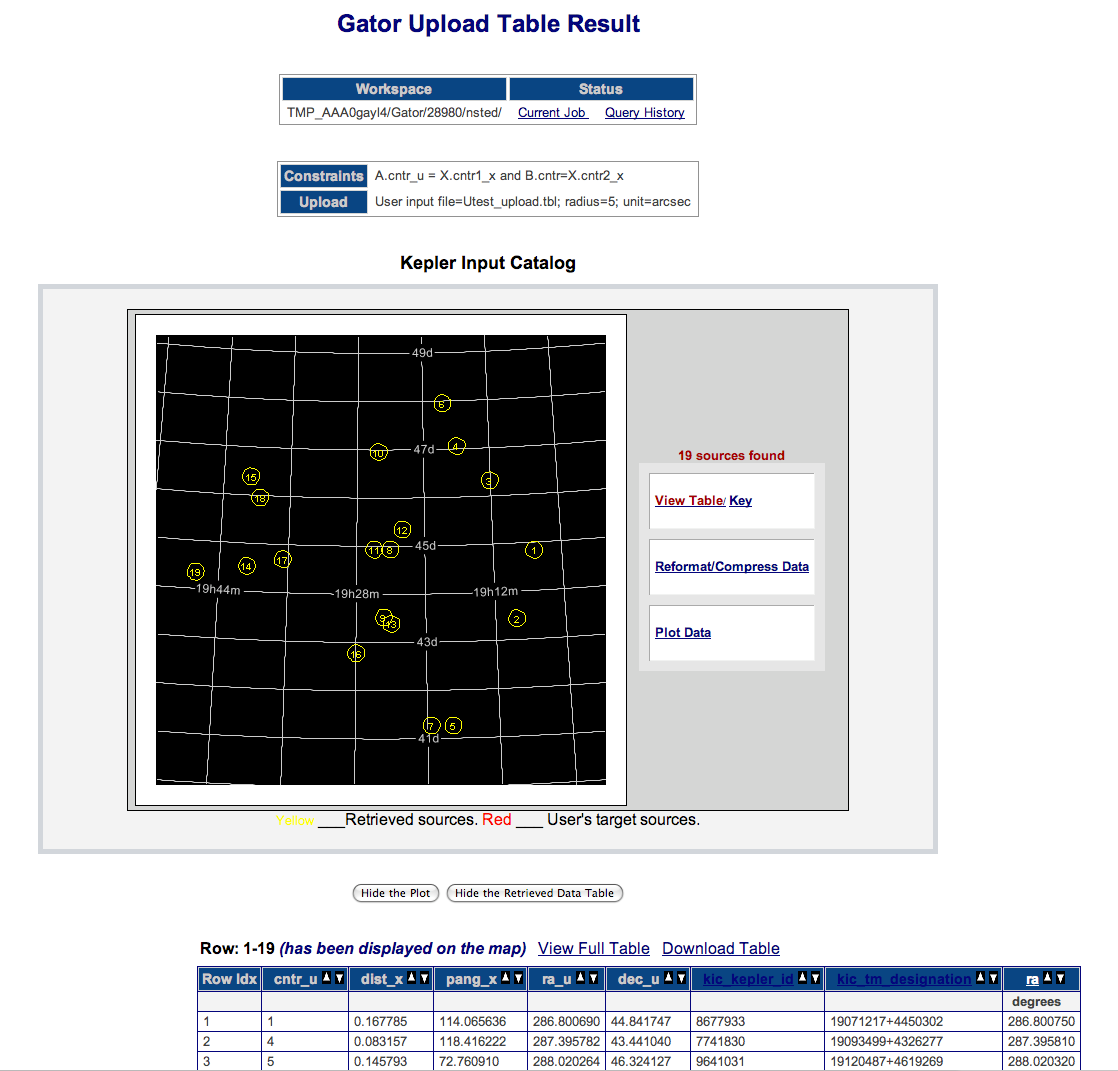
Multi-Object Search (Web Form)
The following search shows how to perform a Multi-Object Search with the Cone Search Radius specified on the web form.
- Click on the Multi-Object Search radio button.
- Save this file to your computer: test_upload.tbl.
- Click on the Choose File button next to the Upload Table option. Select test_upload.tbl.
- In the Cone Search Radius box type: 5. Select "arcsec" from the pulldown menu.
- Click the Sel checkbox next to ra, kic_kepler_id and kic_tm_designation. This will include these parameters in your results.
- Click the Run Query button. Your results will look like this:
with a total of 19 objects returned.
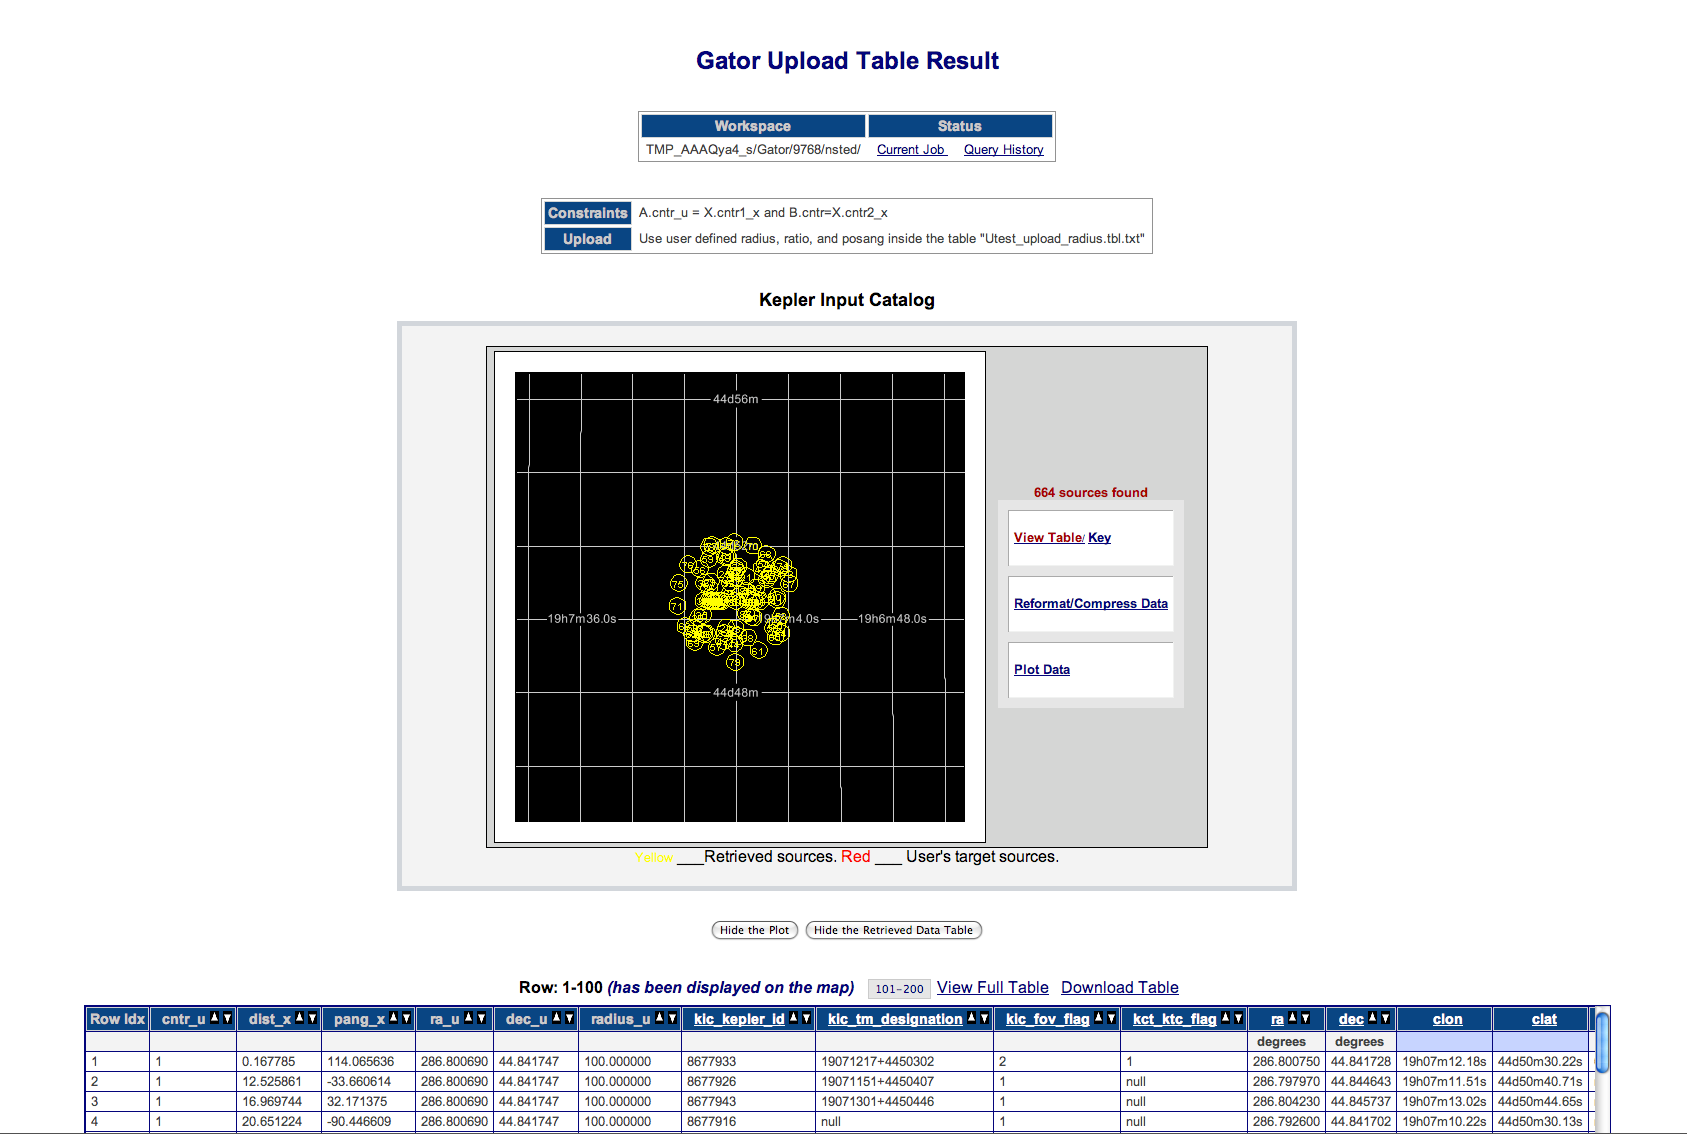
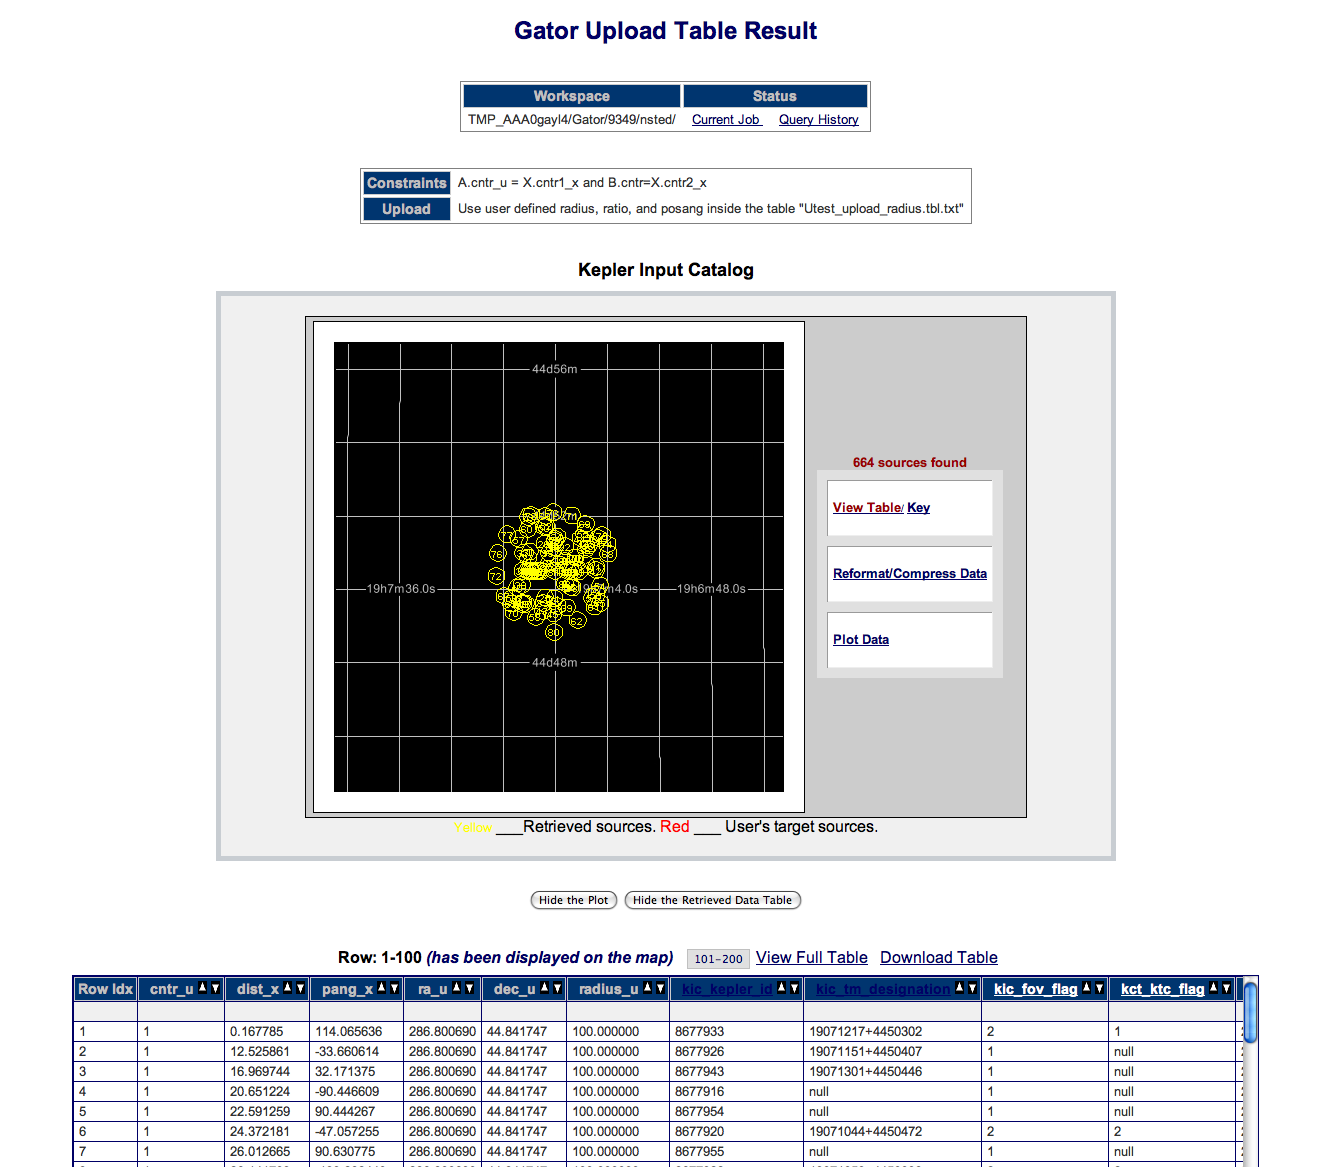
Multi-Object Search (Table)
The following search shows how to perform a Multi-Object Search with the Cone Search Radius specified in the input table. Specifying the radius in the table is useful when you want to supply a different search radius for each object..
- Click on the Multi-Object Search radio button.
- Save this file to your computer: test_upload_radius.tbl.txt.
- Click on the Choose File button next to the Upload Table option. Select test_upload_radius.tbl.txt.
- Verify that the Cone Search Radius is blank. Select "arcsec" from the pulldown menu.
- Click the Sel checkbox next to ra, kic_kepler_id and kic_tm_designation. This will include these parameters in your results.
- Click the Run Query button. Your results will look like this:
with a total of 664 objects returned.
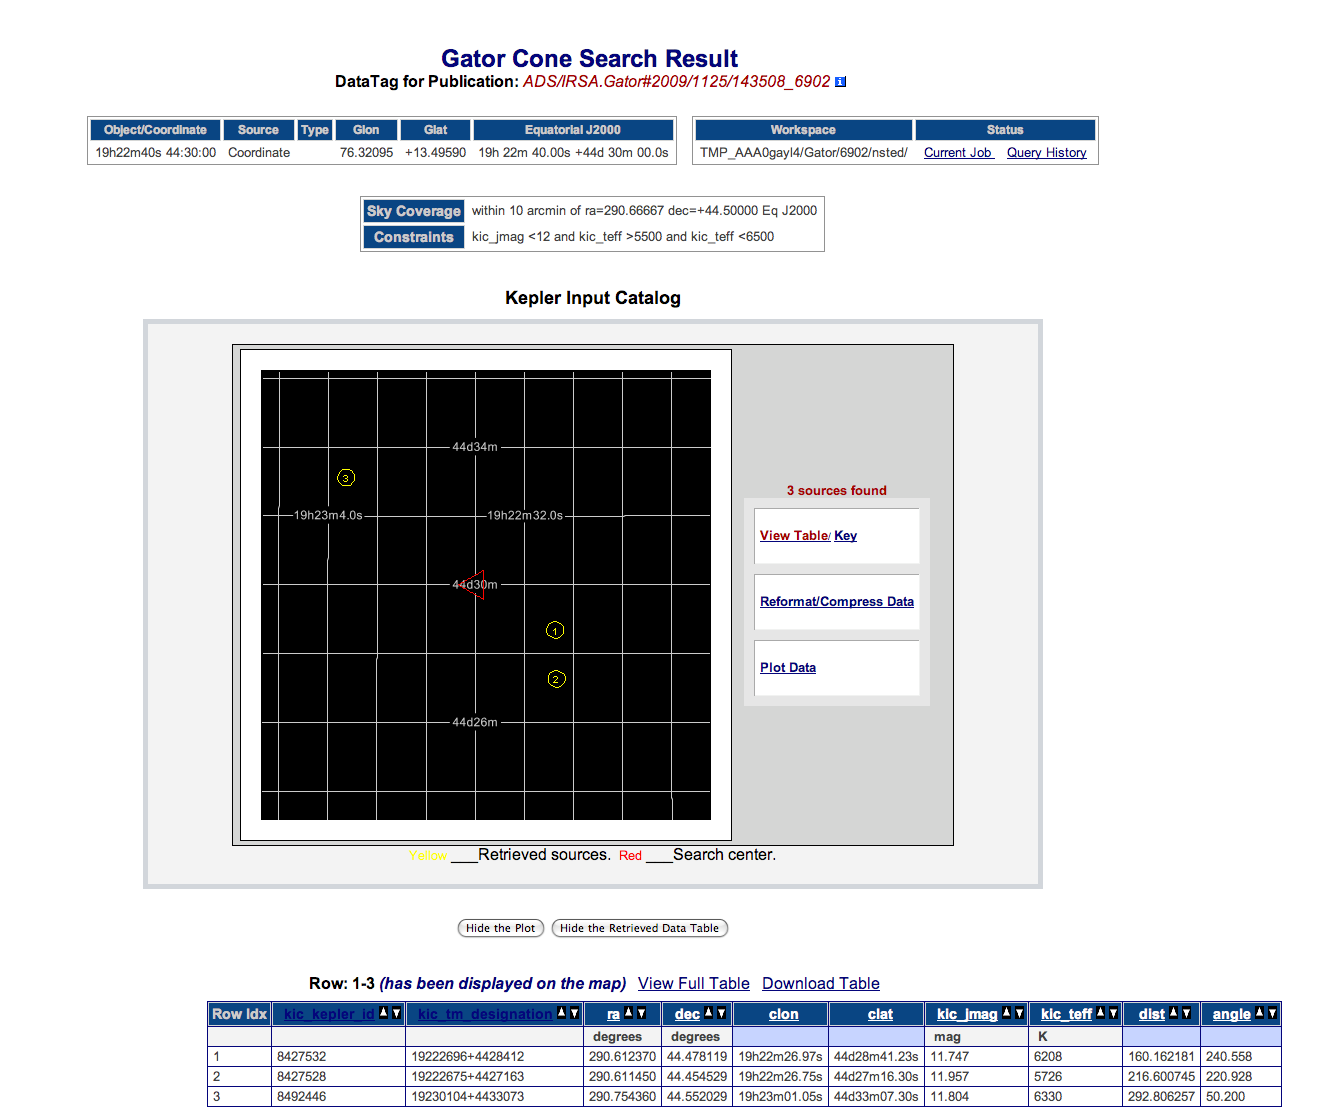
Coordinate Search with Constraints
This example performs the same coordinate search in a cone-shaped area as the previous example, but reduces the number of results using the column constraints, specifically J magnitude
brighter than 12 and an effective temperature between 5,500 and 6,500.
- In the Coordinate or Object Name textbox type: 19h22m40s 44:30:00.
- Click on the radio button next to Cone, if it is not already selected. Type 10 in the radius textbox. Select "arcmin" as the unit from the pulldown menu.
- Click on the radio button next to Table Output, if it is not already selected.
- In the Column Constraint box, click the Clear All Selections button.
- Click the Sel checkbox next to kic_jmag. Type <12.0 in the Low Limit textbox. Note that clicking the Sel box specifies to output that parameter in the Results table.
If this box is not checked, any values specified as Low or Up Limits will still be used to constrain the search.
- Click the Sel checkbox next to kic_teff. Type >5500 in the Low Limit textbox and <6500 in the Up Limit textbox.
- Click the Sel checkbox next to ra, kic_kepler_id and kic_tm_designation. This will include these parameters in your output.
- Click the Run Query button.
Your results page will look like this:
showing a total of 3 objects returned.
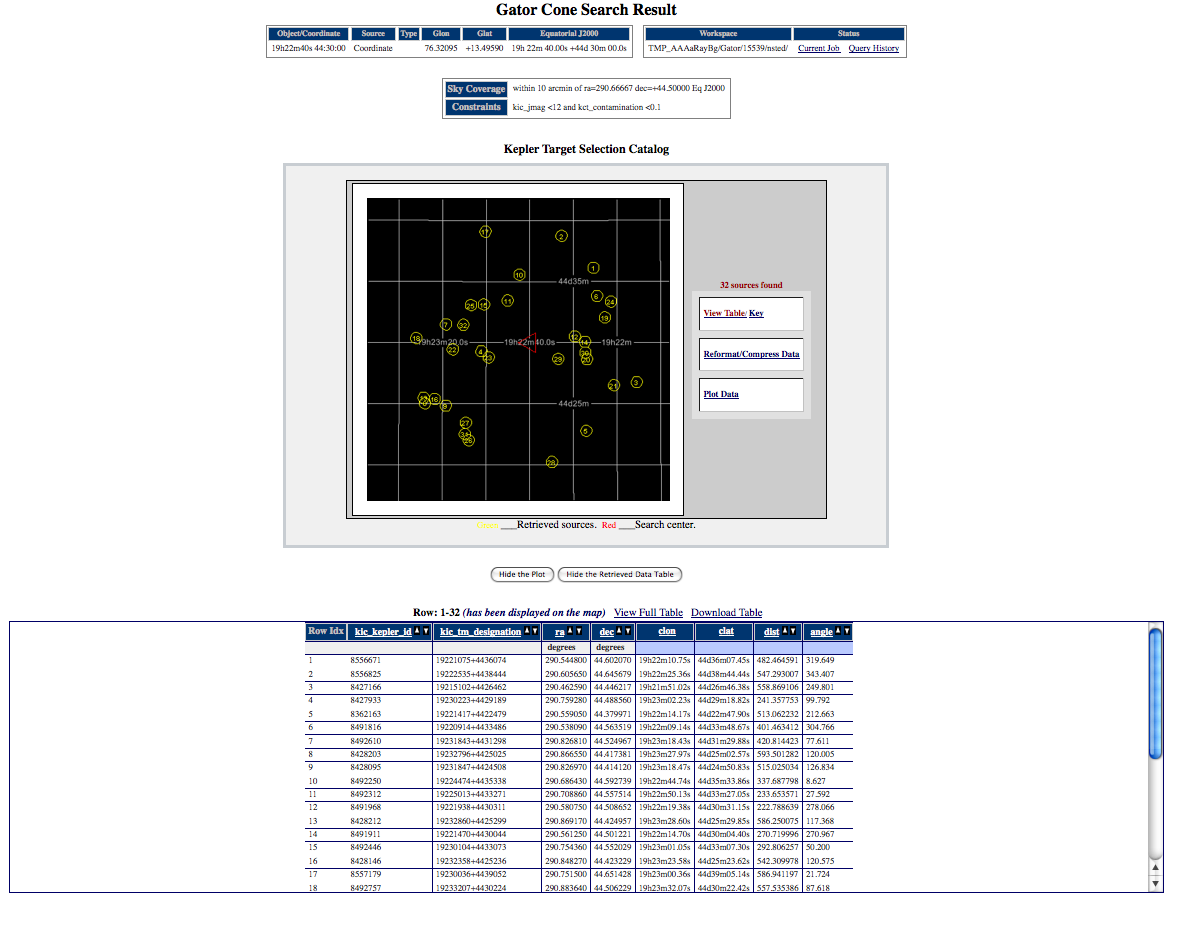
Coordinate Search Using the Long Form with Constraints in Output
This example is the same as the previous example, but uses additional column constraints to refine the results further. These column constraints
are then output in the Results table.
- In the Coordinate or Object Name textbox type: 19h22m40s 44:30:00.
- Click on the radio button next to Cone if it is not already selected. Type 10 in the radius textbox. Select "arcmin" as the unit from the pulldown menu.
- Click on the radio button next to Table Output if it is not already selected.
- In the Column Constraint table, click the Clear All Selections button.
- In the Table Selection section, click the Long Form button.
- Click the Sel checkbox next to kic_jmag. Type <12 in the Low Limit textbox.
- Click the Sel checkbox next to kic_contamination. Type <0.1 in the Low Limit textbox.
- Click the Sel checkbox next to ra, kic_kepler_id and kic_tm_designation. This will include these parameters in your output.
- Click the Run Query button.
Your results page will look like this:
showing a total of 32 objects returned.
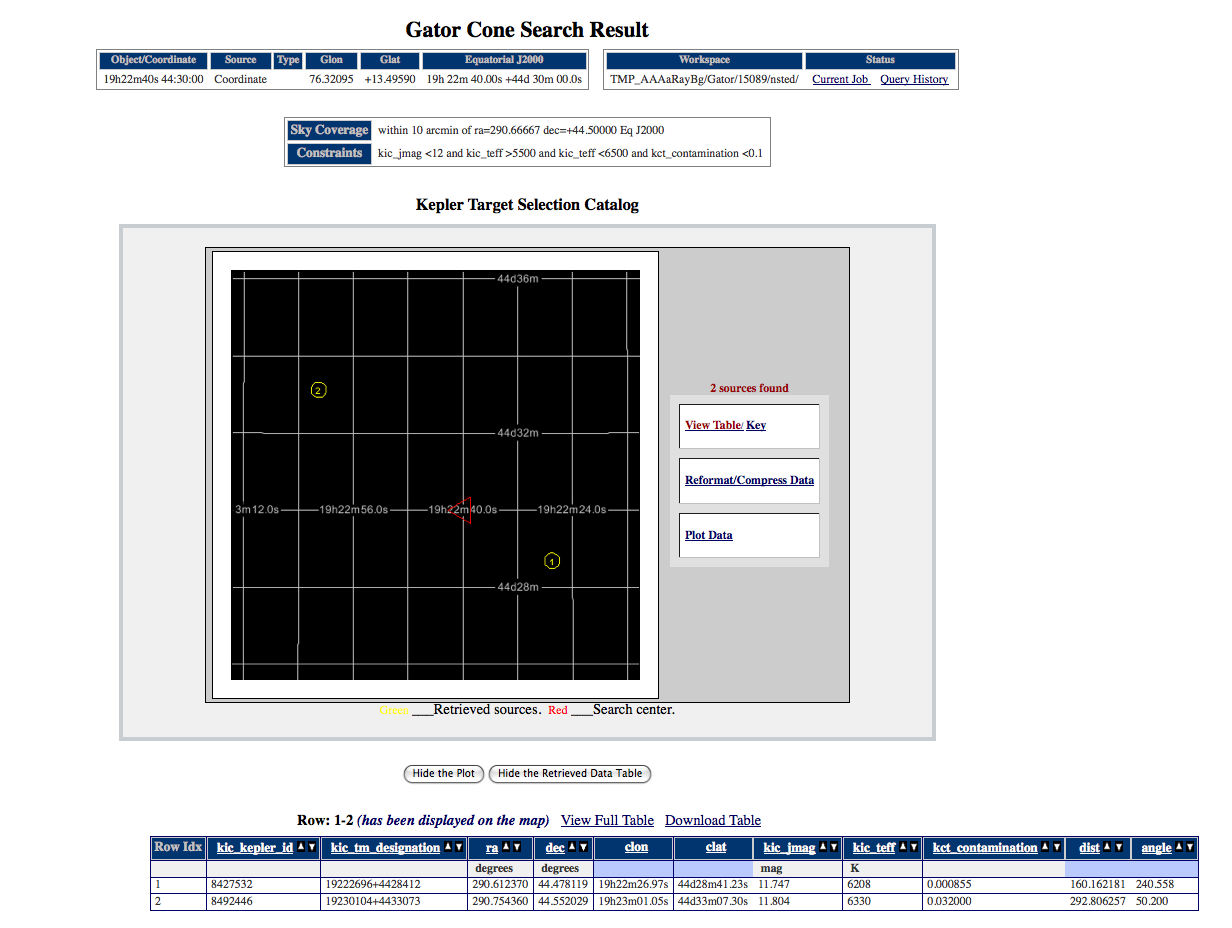
Coordinate Search Using the Long Form with Constraints Not in Output
This example performs the same search as the previous example, but the constraints do not appear in the Results table. This allows you to constrain your
search as you wish, while creating a Results table only showing values of interest.
- In the Coordinate or Object Name textbox type: 19h22m40s 44:30:00.
- Click on the radio button next to Cone if it is not already selected. Type 10 in the radius textbox. Select "arcmin" as the unit from the pulldown menu.
- Click on the radio button next to Table Output if it is not already selected.
- In the Column Constraint box, click the Clear All Selections button.
- In the Table Selection section, click the Long Form button.
- In the kic_jmag Low Limit textbox, type <12.
- Click the Sel checkbox next to kic_teff. Type >5500 in the Low Limit textbox and <6500 in the Up Limit textbox.
- In the kic_contamination row, type <0.1 in the Low Limit textbox.
- Click the Sel checkboxes next to ra, kic_kepler_id and kic_tm_designation. This will include these parameters in your output.
- Click the Run Query button.
Your results page will look like this:
showing a total of 2 objects returned.
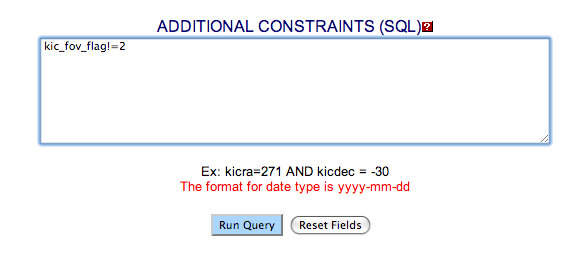
Additional Constraints Query
This example builds on the previous example by adding Additional Constraints to further narrow the search. The additional constraints allow you to constrain the output in ways that cannot be
accomplished using the web form.
- In the Coordinate or Object Name textbox type 19h22m40s 44:30:00.
- Click on the radio button next to Cone if it is not already selected. Type 10 in the radius textbox. Select "arcmin" as the unit from the pulldown menu.
- Click on the radio button next to Table Output if it is not already selected.
- In the Column Constraint table, click the Clear All Selections button.
- Click the Sel checkbox next to kic_jmag. Type <12 in the Low Limit textbox.
- Click the Sel checkbox next to ra, kic_kepler_id and kic_tm_designation. This will include these parameters in your results.
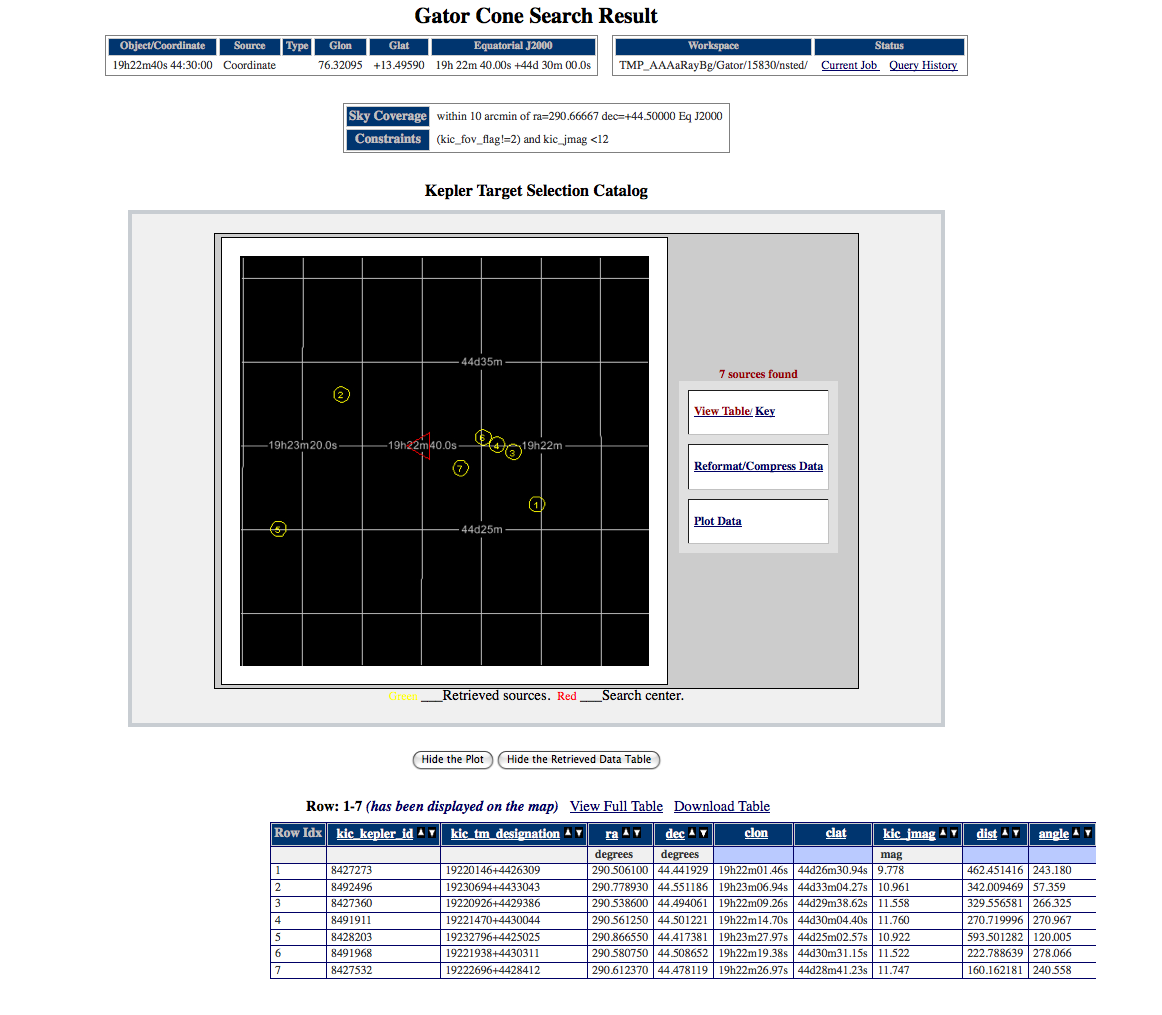
- In the Additional Constraints textbox type: kic_fov_flag!=2. This selects all of the sources that are NOT in the Kepler Target Catalog.
- Click the Run Query button. This will return 7 objects.
All Sky Search - Source Counts
This example demonstrates how to perform a search of the entire Kepler Target Selection Catalog and return an object count. Returning an object count instead of complete entries allows the search to be performed
quickly. This search type is useful when you are starting a new search and are uncertain how many objects will be returned.
- On the Gator query page, click the All Sky Search radio button.
- In the Options box, click the Source Counts Only radio button.
- In the Column Constraints table, click on the Clear All Selections button.
- In the Column Constraints table, click the Sel checkbox in the ra row. (Selecting ra automatically selects dec as well.)
- In the ra row enter: Low Limit >299.5, Up Limit <300.
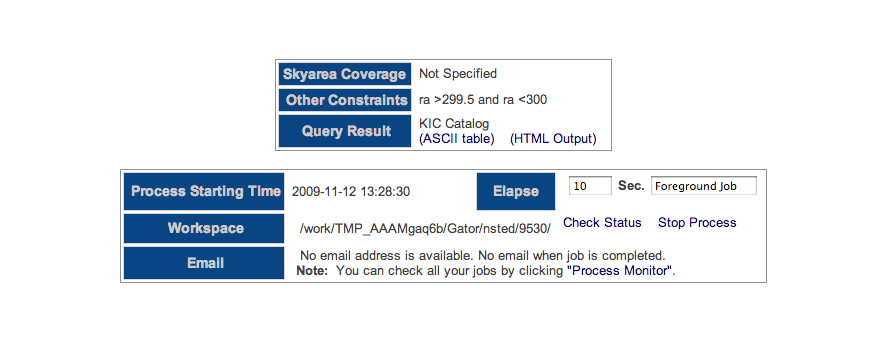
- Click the Run Query button.
- This is a large search, and it will go into background processing. The Gator Query Processing Page will be displayed.
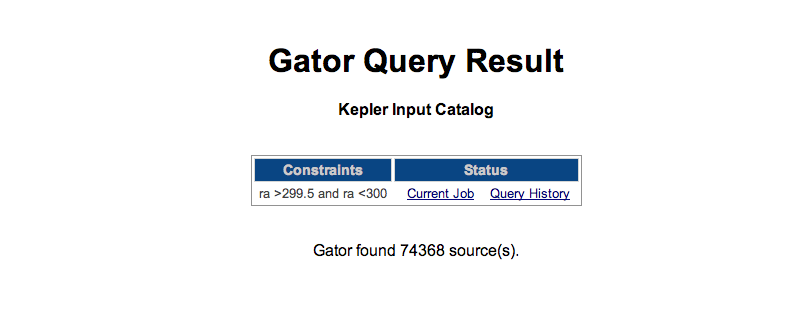
- To check the status of your job, click the Check Status link. When it is finished, click the View Table hyperlink. You should see a value of 74,368 objects returned.
All Sky Search - Table Output
This example is the same as the previous example, except that it returns a table.
- On the Gator query page, click the All Sky Search radio button.
- In the Options box, click the Table Output radio button.
- In the Column Constraints table, click on the Clear All Selections button.
- In the Column Constraints table, click the Sel checkbox in the ra row. (Selecting ra automatically selects dec as well.)
- In the ra row enter: Low Limit >299.5, Up Limit <300.
- Click the Run Query button.
- To check the status of your job, click the Check Status link. When it is finished, click the View Table hyperlink. You should see a value of 74,368 objects returned.
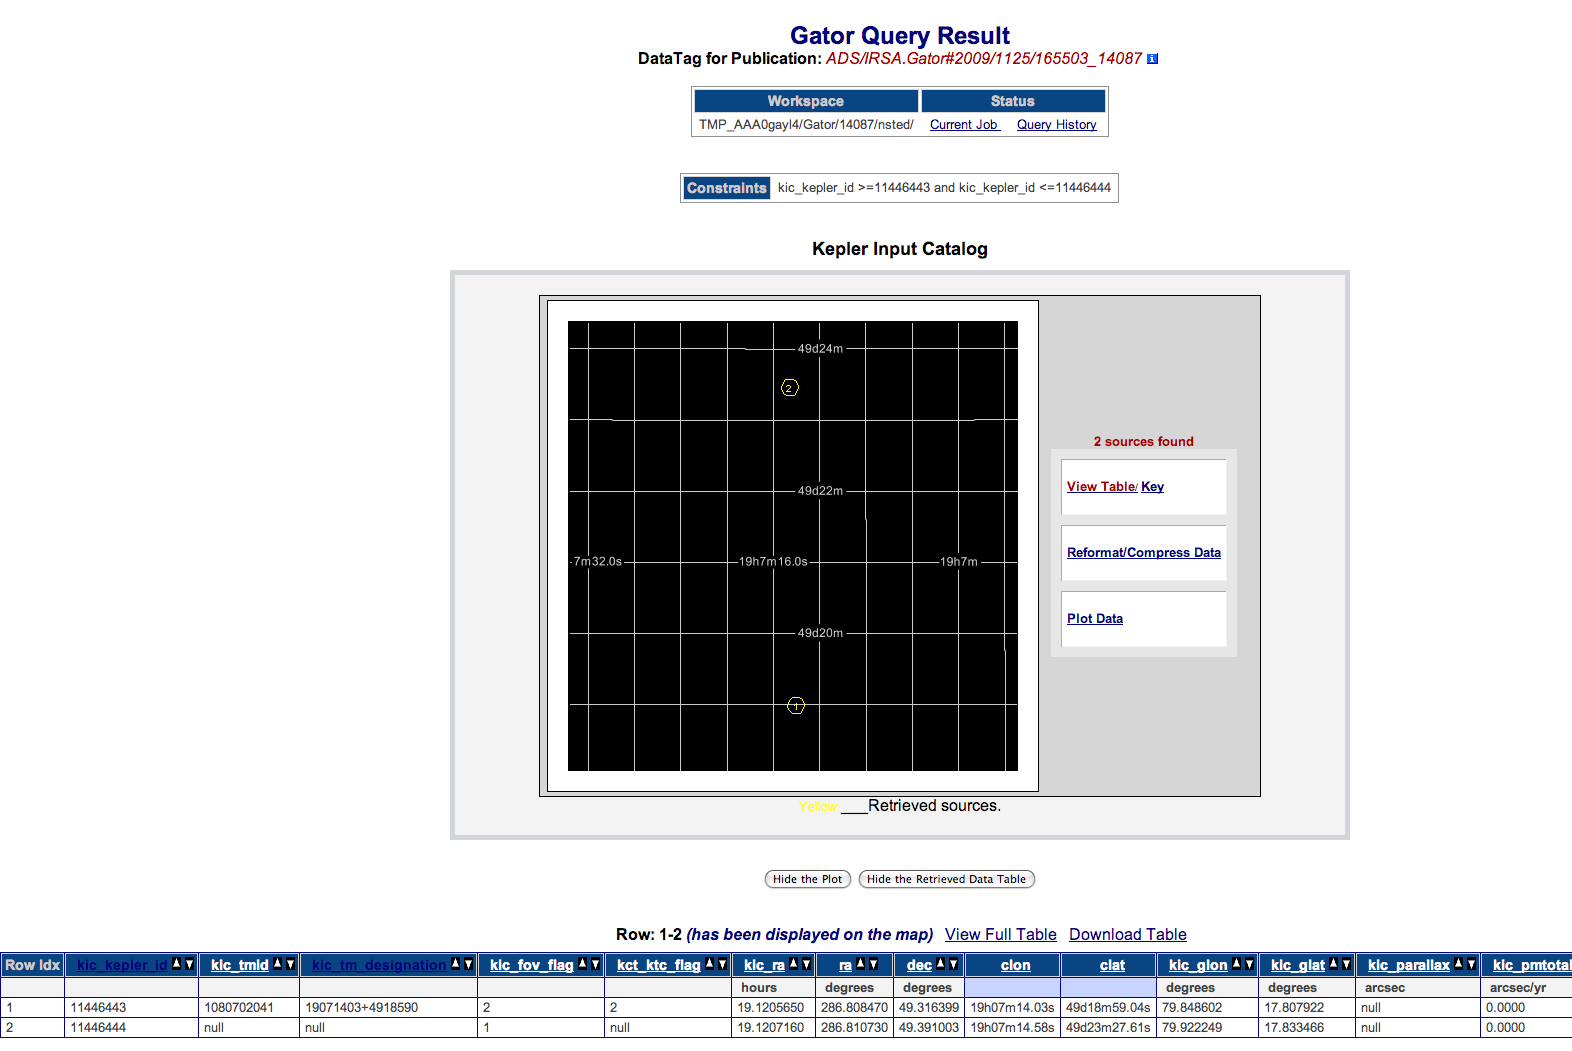
All Sky Search - Kepler KIC IDs
This example shows how to perform a search using Kepler Input Catalog (KIC) IDs.
- On the Gator query page, click the All Sky Search radio button.
- Click on the radiobutton next to Table Output.
- In the Kic_kepler_id row, type >=11446443 in the Low Limit textbox, and <11446444 in the Up Limit textbox.
Two objects will be returned.
PREVIOUS START