The first step in an IRSCLEAN session is to read in some FITS data. If you do not enter a value for dataFile (the first argument) then you will be asked to browse your directories and pick a file. If you hit "Cancel" you will end your session.
Figure 6.1 The image scaling widget.
6.2 Scaling Image Display
The keyword DataRange sets the image scaling when displaying during mask-editing mode. (If you leave out the keyword, the default scaling is based on the histogram of image values, which usually looks fine.) DataRange should be either set to actual known values, or [0,0], which will activate the manual display scaling widget (Figure 6.1)[1]. (This pops up just prior to mask editing.) Simply drag the cursor across the image with the left mouse button depressed. Dragging up will increase the contrast (decrease the spread of displayed brightnesses) and dragging to the right will increase the midpoint of the displayed brightnesses. When you’re satisfied with the image scaling, click on File->Return to IRSCLEAN to close the window.
The next step is to obtain or build a mask of bad pixels. The input image is an aid to help you either judge the validity of a preexisting mask or build a new mask, as well as a guide to editing the mask.
6.3 Reading a Preexisting Mask (inRmask_File, /CampaignRmask)
One way to use the program is to take a preexisting rogue mask and edit it. If you run irsclean_mask without either inputting a rogue mask or asking the program to find its own mask (using /getFmask), you will be asked to browse your computer for a rogue mask. IRSCLEAN will automatically choose the appropriate campaign-based rogue mask and enter it in a file picker dialog, asking you to pick a rogue mask to edit. You can select that mask, or use the dialog to browse your computer to another location and pick another mask. Alternately, you can forego having to select the campaign mask by entering /CampaignRmask at the command line. This will automatically load the campaign mask.
You can force the program to use a specific rogue mask by adding (eg) inRmask_File='rmask.fits' (to specify a filename) or inRmask_File=' (to be queried for a filename) to the calling sequence.
Combining Rogue Masks: You can input or select more than one rogue mask by either entering a vector of file names at the command line (eg., inRmask_File=['mask1.fits','mask2.fits']) or selecting multiple files in the file picker dialogue. (On most platforms, multiple files can be selected using the Control key along with the left mouse button. They are, however, limited to being in the same directory when chosen in this way.) You can also select the campaign rogue mask (/CampaignRmask) as well as one or more rogue masks (inRmask_File). Masks will be combined using logical OR.
The rogue dialogue will always pop up unless you have set /getFmask, /CampaignRmask, or inRmask_File equal to a nonblank string. In any case, keep in mind that you can always hit "Cancel" under the Rogue Mask dialogue and choose not to use an externally-derived rogue mask. (See Creating a Mask Manually From Scratch below.)
If you input a file that doesn't exist, IRSCLEAN will ask you to choose a different file.
Be careful! IRSCLEAN does not care what file you input as a rogue mask. If you get strange results, then check the text output of your session. You will get a WARNING message if your mask file is either not made up of integers, or from the wrong (or unknown) IRS module, but IRSCLEAN will still try to process the data.
6.4 Creating a Mask Manually from Scratch
You do not have to use a preexisting mask. In fact you can create a mask from scratch interactively using the mouse. Leave out inRmask from the calling sequence and hit "Cancel" when asked to choose a rogue mask file. If no other mask is given or derived, you will enter Mask-Edit mode with the image of your data having no rogue mask overlayed. See Mask-Edit Mode below to learn how to build the mask.
6.5 Letting IRSCLEAN Find a Mask Automatically (getFmask)
IRSCLEAN can also find a mask for you if you set getFmask. This runs the WCLEAN algorithm on your data and produces a mask "on-the-fly" for you to edit. If getFmask is set, the default is not to require an external rogue mask too, unless inRmask or /CampaignRmask is also set.
The code for deriving rogue masks from an image is given in the IDL procedure wclean_multires.pro, which is part of the IRSCLEAN distribution. This code attempts to detect rogue pixels as extremely bright lone pixels or clusters of pixels in a small-scale component of the image, using one of two approaches, invoked by setting either getFmask=1 (or, equivalently, /getFmask); or getFmask=2.
6.5.1 getFmask=1: the Hierarchical Iterative Method (/getFmask, AGGRESSIVE,/ABS_VAL, /NEGATIVE_ONLY,ORDERS,/peakUp)
Prior to IRSCLEAN 2.0 this was the only built-in method of finding rogue pixels. It starts from the multi-median transform[2] of the input image, decomposing it into a sum of images representing successively larger resolution scales (kernel diameter 3, 5, 9, 17, and 33 pixels, plus a smooth remainder. The algorithm measures the noise level in either the interorder region of the image or, if the ORDERS keyword is set, within each order separately. The program then iteratively attempts to find bright pixels in the first component of the multi-median transform, as compared with neighboring pixels in the first and the second multi-median components. Depending on the value of the AGGRESSIVE keyword (see below), certain constraints are imposed on whether or not a multi-median transform feature is considered a rogue pixel or a member of a group of rogue pixels. If you find that the default setting finds too many or too few rogue pixels, use the keyword AGGRESSIVE to adjust the constraints on the rogue-finding algorithm (default is AGGRESSIVE=0).
The default value of AGGRESSIVE is 0. Lower values will yield fewer pixels identified as rogue, higher values will yield more. You can set AGGRESSIVE to any negative or positive floating point value, but most datasets only show an effect for values between about -2 and +2. The keyword controls three things:
1. The number of iterations of the rogue-finding procedure. The first iteration is performed on the input data. Subsequent iterations are performed on an image which has been cleaned of the previous iteration's rogues. If AGGRESSIVE is less than or equal to 0, there will be only one iteration. As AGGRESSIVE increases above zero, the number of iterations increases by 9 for every unit increase in AGGRESSIVE.
2. The sigma threshold above which a pixel is accepted as a candidate rogue. The value of sigma is determined in the first multi-median component of the original image (smoothing kernel 3 pixels). For AGGRESSIVE=0, a pixel is a rogue candidate if its value in this transform component is greater than 4 times sigma. The sigma threshold decreases by a factor of 2 per unit increase in AGGRESSIVE, reaching 0 at AGGRESSIVE=2. Thus, for AGGRESSIVE greater than or equal to 2, there is no sigma constraint on a pixel being considered for rogue status (although other constraints must be met, such as no more than 2 adjacent pixels in either direction are allowed to be rogues).
3. The detection of rogues in clusters. For values of AGGRESSIVE less than or equal to 0.5, a pixel which exceeds the sigma threshold can only be considered a rogue if it has no neighbors that also fulfil this criterion. For AGGRESSIVE greater than 0.5, however, rogues can be found in clusters, so long as a candidate rogue cluster is no larger than 2 pixels in either direction. For AGGRESSIVE greater than 0.5, in addition to accepting single rogue pixels that are next to already-found rogues, the program will deliberately search for additional clusters of rogues using a hierarchical segmentation technique[3] to identify continguous significant regions in the first two multimedian components.
The consequences of changing AGGRESSIVE are summarized in Table 6.1. Note: underlines indicate a value is included in the range.
Table 6.1 Changing the AGGRESSIVE Parameter
Aggressive
(getFmask=1)
Number of Iterations
Sigma Threshold
Clusters?
≤0
1
≥ 4.0σ
No
0 to 0.5
1 to 6
4 σ to 3.0σ
No
0.5 to 2.0
6 to 19
3σ to 0
Yes
≥2.0
≥19
0
Yes
NOTE: To Include Negative Pixels in the Search, use the keywords /ABS_VAL or /NEGATIVE_ONLY in conjunction with getFmask. Normally the rogue-finding algorithm only looks for positive-valued rogue pixels. But sometimes there are high negative pixels that you also want to mask. (This is often the case when you are using background-subtracted data where the source and background images both had rogue pixels and the subtraction does not cancel out the rogues exactly.) The keyword /ABS_VAL tells IRSCLEAN that you want to look for both "positive" and "negative" rogue pixels. The keyword /NEGATIVE_ONLY tells IRSCLEAN to only look for "negative" rogues.
This method, new with IRSCLEAN 2.0, attempts to remove slowly varying trends from the data (“flattening”) through a double application of unsharp-masking, which (in theory) leaves only single or a few-pixel spikes (rogue pixels). The rogues can be found by thresholding the flattened data.
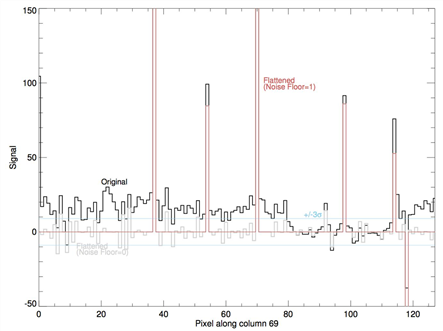
Figure 6.2 Double unsharp-mask flattening method of rogue pixel detection, Long-Low data along row 69.
We show here (Figure 6.2 and Figure 6.3) two examples of the double unsharp-mask flattening method of rogue pixel detection as applied to sample data files located in the IRSCLEAN distribution. The first example (Figure 6.2) uses Long Low data located in sampledata/r13349376/ch2/bcd/SPITZER_S2_13349376_0008_0000_8_bcd.fits. The plot shows data along colum 69 of this image (black), and double unsharp-mask flattened versions of it, for two different values of keyword Noise_Floor: 0 (gray) and 1 (red). Rogue pixels are clearly visible to the eye as “spikes”, single pixels with anomalously high signal, but given the presence of gradients, it is difficult to identify them automatically from the original data. The algorithm performs a first unsharp masking by subtracting a two-dimensional median-filtered image (smoothing kernel of 3 pixels) from the original data. (This is the first component of the multi-median transform described above.) The progam clips the resulting data, setting to zero all values below a noise floor given by the keyword Noise_Floor times the Gaussian standard deviation. The default is Noise_Floor=1. Setting Noise_Floor=0 turns off clipping, and allows all data to be considered signal. The next step is to unsharp mask the columns of the resulting image, approximating the removal of behavior along the dispersion (wavelength) direction with characteristic scales greater than 3 pixels (i.e., continuum and resolved spectral features). The resulting “flattened” image usually has very few noticeable gradients or bumps, but retains “spiky” rogue pixels. A simple threshold will then enable the identification and masking of the rogues. Use the Rogue_Thresh keyword to tailor the multiple of the standard deviation above which a pixel in the flattened image is considered a rogue pixel (the default is Rogue_Thresh=3). The flattened profiles in the figures above display what happens when Noise_Floor is varied. The gray curves (Noise_Floor=0)show many non-rogue pixels that exceed the threshold (as shown by the blue lines), but the red curves (Noise_Floor=1)appear to isolate the rogue pixels quite well.
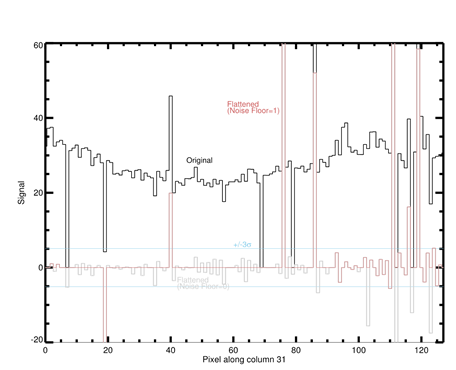
The second example (Figure 6.3) is Long High data located in sampledata/r13349376/ch3/bcd/
SPITZER_S3_13349376_0012_0000_8_bcd.fits. As for the previous example, setting a Noise_Floor=0 (gray) erroneously allows non-rogue pixels to pass the Rogue_Thresh=3 criterion, whereas the red curve shows that the only pixels with absolute value greater than are rogues.
Figure 6.3 Double unsharp-mask flattening method of rogue pixel detection, Long-High data along row 31.
Note: Noise_Floor and Rogue_Thresh, relate to two different measures of the spread of the data. The noise standard deviation (Noise_Floor units) is derived assuming Gaussian statistics, so this value is usually a few times higher than the robust estimate of used to threshold rogue pixels (Rogue_Thresh units). Default values of these parameters (Noise_Floor=1 and Rogue_Thresh=3) work well for the sample data. If you are not having any luck with these settings, however, the best approach is to vary them slowly around the defaults. Remember, reducing either Noise_Floor or Rogue_Thresh enables the detection of more rogue pixels.
The /ABS_VAL and /Negative_Only keywords have the same meaning under getFmask=2 as under getFmask=1. Furthermore, the AGGRESSIVE keyword can be used in place of Rogue_Thresh when getFmask=2. They are related via the equation:
6.6 Specifying Your Own Subroutine for Automatic Mask Finding (maskFunction=, AGGRESSIVE, /ABS_VAL, /NEGATIVE_ONLY)
Some users find that the built-in rogue-finding algorithm invoked by getFmask is either too aggressive, or not aggressive enough in finding rogue pixels. You may separately (or additionally) specify your own subroutine to create a rogue pixel mask from the input image using the keyword maskFunction = [function name]. The [function name] is the name (or array of names) of a user-supplied IDL function (or set of functions) that independently creates a rogue mask from your data. Each function should be in its own file in your IDL_PATH, with the same name (plus ".pro") as the function itself. Each user-defined function will be called from inside the irsclean_mask main program. The function declaration statement must be of the following form.
FUNCTION irsclean_threshall,orig_img,omask,AGGRESSIVE=AGGRESSIVE,$
NEGATIVE_ONLY=NEGATIVE_ONLY,ABS_VAL=ABS_VAL
The first entry after the FUNCTION statement is of course the function name. This is followed by the following local IRSCLEAN variables:
orig_img: the fits data used to find the mask (eg., input using dataFile)
omask: the order mask image, obtained automatically by irsclean_mask, specifying the order number as a function of pixel. (See Appendix 2 for an image showing the mapping of order number to pixel in the IRS arrays).
AGGRESSIVE, NEGATIVE_ONLY, and ABS_VAL: the values of these keywords that you input to irsclean_mask
All user-defined functions should have the same definition statement, with the exception of the function name. (This admittedly inflexible calling sequence may be relaxed in later releases.) The output of your function call should be a 128 x 128 byte array of 1's and 0's. If it is not, the result will be ignored.
The sample function irsclean_threshall.pro (the first line of which is copied above) is included with the IRSCLEAN distribution. This function designates as bad all pixels greater than a quantity of sigma, dependent on the value of the AGGRESSIVE keyword. Sigma is measured as the standard deviation in the inter-order region. You can invoke this function by adding maskFunction = 'irsclean_threshall' to the irsclean_mask call. Keywords /ABS_VAL and /NEGATIVE_ONLY work as described above (6.5.1).
An input rogue mask (inRmask=), the found mask (getFmask=), and any user-defined mask (maskFunction=) will be combined together in one super-mask if you invoke more than one of these mask input keywords. IRSCLEAN will combine the binary rogue, found, and user-defined masks using the Boolean relational operator OR.
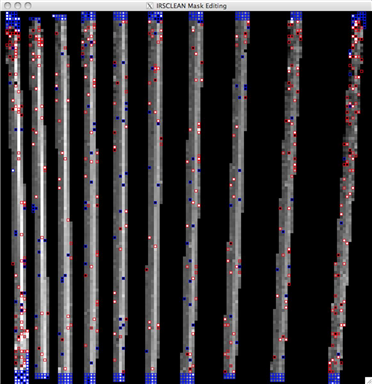
The heart of the mask-making process is Mask-edit Mode, where IRSCLEAN will overlay the current mask as built from the rogue mask, found mask, and/or user-defined mask (or no mask at all if you have decided to build a mask from scratch), and you have the opportunity to accept or reject masked pixels, and even add new ones.
is shown in Figure 6.4. Red squares indicate pixels in the rogue mask (derived using the double unsharp-mask method via getFmask=2). Blue squares indicate pixels that have been masked fatally by the pipeline BMASK. Interorder pixels are blanked out (in display only), since these pixels will not get cleaned and do not contribute to the extracted spectrum. The automatic rogue-finding algorithm did a decent job of finding most of the rogue pixels, although there are a few missed rogues and some false positives.
Now you have the chance to select pixels with the mouse cursor. Clicking on a pixel with the left mouse button will toggle its mask status "on" or "off". Alternatively, you can toggle the mask status of a pixel by typing ‘m’ at the keyboard.
NOTE: while it is possible to toggle the status of a blue BMASK pixel to rogue and clean it, thus bringing the pixel back “into the fold,” we recommend against this. The IRS spectral extraction software can handle the few BMASK pixels that occur in the middle of an order; they will not affect your spectrum. And there is not enough information to clean properly the BMASK pixels on the edges of a spectral order.
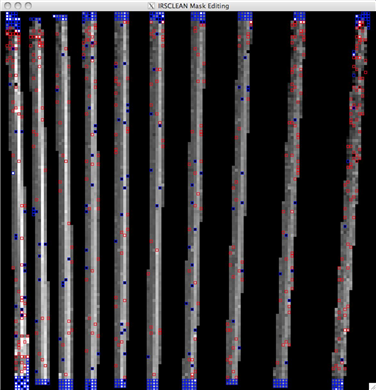
Figure 6.5 Mask-edit mode, after cleaning.
If you need to rescale your image during mask-editing, you can type ‘r’ to open the manual display scaling widget (Section 6.2).
Clicking the right mouse button in the graphics window (or typing ‘c’) will clean the data using the current mask, and overlay the mask on the cleaned image for your examination. After editing the mask above to remove illuminated pixels and add missed hot (or cold) bad pixels, we click the right mouse button or type ‘c’, and obtain the image in Figure 6.5.
NOTE: Pixels in between spectral orders (defined by the order mask) will not get cleaned. They are "blanked out" in display.
NOTE: for keyboard shortcuts to work, the cursor focus needs to be on the terminal in which you invoked IDL (the cursor should be active). This is usually the case at the beginning of your session, but the focus can move to another window if you go through more than one mask-editing iteration (for example, when you click ‘No’ on the “Done editing mask” dialogue or rescale your image by typing ‘r’). Keyboard shortcuts will not work from the IDL Workbench.
The mask we produced in this example is saved in sampledata/r13349376/ch3/bcd/SPITZER_S3_13349376_0012_0000_4_rmask.fits under the IRSCLEAN distribution.
You are then asked if you want to save the mask and exit Mask Edit Mode. If you choose ‘No’ you will return to Mask-Edit mode and be allowed to add or remove pixels from the mask again. NOTE: You must choose "Yes" to proceed to Stage 2, data cleaning. If you do not wish to save the mask, then select "Cancel" in the mask-saving dialog. Only pixels in the order mask are cleaned, so inter-order pixels do not get cleaned even though they might be picked as rogue pixels.
In Mask-Edit Mode, you can also click the middle mouse button in the graphics window (or type ‘q’) and quit the whole program. The mouse and keyboard choices available during Mask-Edit Mode are listed in Table 6.2.
6.9 Saving Your Mask (outRmask_File)
The result of a successful IRSCLEAN session is a new rogue mask. When you click the right mouse button or type ‘c’ in Mask-Edit mode, the program will ask you are done editing your mask. If you are satisfied, hit ‘Yes’ and you will be allowed to pick an output filename to which to save the mask, unless you have already set the value (using the keyword outRmask_File). The default file name is of the form b[chan]_rmask.fits, where chan indicates the IRS channel number (0=Short Low, 1=Short High, 2=Long Low, 3=Long High).
NOTE: You are not required to save a mask file. Simply choose "Cancel" in the file saving dialogue to move on to the next stage.
6.10 Saving Your Cleaned Data (outClean_File)
After saving your mask, you are also given the opportunity to save the cleaned image that is currently displayed in your IDL graphics window. If you answer "Yes" to the query, then a file-saving dialog will open, unless you have already set the outClean_File keyword. As usual, setting outClean_File=' (blank string) will automatically load the file picker. The default file name is taken from the input data file, with the suffix "_clean" inserted before the ".fits" extension. A HISTORY line to the effect that the file has been cleaned using irsclean_mask.pro will be added to the FITS header. NOTE: If they exist, the corresponding uncertainty and mask files will also be "cleaned" automatically (see “Cleaning Uncertainty and Mask Files,” below).
6.11 Automatically Saving the Rogue Mask and Cleaned Data (/Autosave)
The /Autosave keyword will skip file picker dialogs for outRmask_File and outClean_File, and save the mask and cleaned images in files with default names (see Sections 6.9 and 6.10 for details).
It is possible to skip interactive editing of the rogue mask, using the /noMaskEdit keyword. This is useful when you are processing a data file with a predefined rogue mask (or the Campaign rogue mask), or if you are calling irsclean_mask from another program as a batch process.
In general, the purpose of Stage 1 is to create a bad pixel mask to apply to one or more BCD images in Stage 2. In many cases, however, a mask is only applicable to the BCD image that was used to create it. By default, the program normally flows directly to Stage 2 after saving the cleaned image used to make the mask. To quit instead after making the mask and/or cleaning its “parent” BCD image, use the keyword /noStage2.
6.14 Full Batch Mode (getFmask, /CampaignRMask, inRmask_File, /noMaskEdit, /autoSave, /noStage2)
To run IRSCLEAN in a fully noninteractive manner, invoke getFmask, /CampaignRMask, or inRmask_File (or any combination thereof—the goal is to define a rogue mask outside of Mask-Edit Mode); and set /noMaskEdit, /autoSave, and /noStage2: